Werkzeug是一个全面的WSGI Web应用程序库。它最初是WSGI实用程序各种工具的简单集合,现已成为最高级的WSGI实用程序库之一,是Flask背后的项目。Werkzeug 是一个德语单词,工具的意思。这个单词发音对我来说,有点困难(可能也是它知名度不高的重要因素之一),刚好官方logo是个锤子,我就简称“德国锤子”。对Werkzeug正确发音这块有兴趣的朋友,可以查看底部的参考链接。本文分下面几个部分:
- 概要
- serving && wsgi
- request && response
- local实现
概要
本次代码采用的版本是 2.0.0, 项目主要结构如下:
| 文件 |
描述 |
| serving |
http服务和wsgi规范的实现 |
| request && response |
请求和响应处理 |
| local |
多线程部分实现 |
| middleware |
中间件部分实现 |
| routing && urls |
路由和URL的处理 |
| datastuctures |
数据结构 |
“德国锤子”项目比较重要,我会使用概读法和慢读法把项目尽量读透。文章计划分为上下两篇,本文是上篇,介绍前3个部分。
正式开始之前,我们先回顾一下http服务和wsgi-application。
http服务简单回顾:
 1
 2
 3
 4
 5
 6
 7
 8
 9
10
11
12
13
14
15
16
17
18
|
# http/server.py
def test(HandlerClass=SimpleHTTPRequestHandler,
         ServerClass=HTTPServer, protocol="HTTP/1.0", port=8000, bind=""):
    server_address = (bind, port)

    HandlerClass.protocol_version = protocol
    with ServerClass(server_address, HandlerClass) as httpd:
        sa = httpd.socket.getsockname()
        serve_message = "Serving HTTP on {host} port {port} (http://{host}:{port}/) ..."
        print(serve_message.format(host=sa[0], port=sa[1]))
        try:
            httpd.serve_forever()
        except KeyboardInterrupt:
            print("\nKeyboard interrupt received, exiting.")
            sys.exit(0)

# self.rfile.readline(65537)
# self.wfile.write(body)
|
- HTTPServer负责实现http服务。
- SimpleHTTPRequestHandler处理http请求。
- 请求和响应在rfile和wfile这2个IO上。
wsgi-application简单回顾:
 1
 2
 3
 4
 5
 6
 7
 8
 9
10
11
12
13
14
15
16
17
18
19
20
21
22
23
24
25
26
27
|
# wsgiref/simple_server.py
def demo_app(environ,start_response):
    from io import StringIO
    stdout = StringIO()
    print("Hello world!", file=stdout)
    print(file=stdout)
    h = sorted(environ.items())
    for k,v in h:
        print(k,'=',repr(v), file=stdout)
    start_response("200 OK", [('Content-Type','text/plain; charset=utf-8')])
    return [stdout.getvalue().encode("utf-8")]

def make_server(
    host, port, app, server_class=WSGIServer, handler_class=WSGIRequestHandler
):
    """Create a new WSGI server listening on `host` and `port` for `app`"""
    server = server_class((host, port), handler_class)
    server.set_app(app)
    return server

if __name__ == '__main__':
    with make_server('', 8000, demo_app) as httpd:
        sa = httpd.socket.getsockname()
        print("Serving HTTP on", sa[0], "port", sa[1], "...")
        import webbrowser
        webbrowser.open('http://localhost:8000/xyz?abc')
        httpd.handle_request()  # serve one request, then exit
|
- WSGIServer实现符合wsgi规范的http服务
- WSGIRequestHandler实现wsgi的请求
- wsgi-application负责实现wsgi应用程序
- 应用程序从environ中获取请求数据,使用start_response回调函数处理http响应头,使用返回值返回请求数据
serving
serving模块提供服务入口,使用 argparse 处理命令行工具:
 1
 2
 3
 4
 5
 6
 7
 8
 9
10
11
|
def main() -> None:
    """A simple command-line interface for :py:func:`run_simple`."""
    import argparse
    ...
    run_simple(
        hostname=hostname or "127.0.0.1",
        port=int(port or 5000),
        application=import_string(args.application),
        use_reloader=args.reload,
        use_debugger=args.debug,
    )
|
- 主要就3个参数,服务器IP和端口不用说了,重点是application,可以是外部模块名,自动加载。
负责创建服务的方法:
 1
 2
 3
 4
 5
 6
 7
 8
 9
10
11
12
13
14
15
16
17
18
19
20
21
22
23
|
def make_server(
    host: str,
    port: int,
    app: "WSGIApplication",
    threaded: bool = False,
    processes: int = 1,
    request_handler: t.Optional[t.Type[WSGIRequestHandler]] = None,
    passthrough_errors: bool = False,
    ssl_context: t.Optional[_TSSLContextArg] = None,
    fd: t.Optional[int] = None,
) -> BaseWSGIServer:
    if threaded:
        return ThreadedWSGIServer(
            host, port, app, request_handler, passthrough_errors, ssl_context, fd=fd
        )
    elif processes > 1:
        return ForkingWSGIServer(
            host, port, app, processes, request_handler, passthrough_errors, ssl_context,fd=fd,
        )
    else:
        return BaseWSGIServer(
            host, port, app, request_handler, passthrough_errors, ssl_context, fd=fd
        )
|
多线程和多进程服务使用MixIn方式组合而来:
1
2
3
4
5
6
|
class ThreadedWSGIServer(socketserver.ThreadingMixIn, BaseWSGIServer):
    multithread = True
    daemon_threads = True

class ForkingWSGIServer(ForkingMixIn, BaseWSGIServer):
    multiprocess = True
|
WSGIServer的基础实现:
 1
 2
 3
 4
 5
 6
 7
 8
 9
10
11
12
13
|
class BaseWSGIServer(HTTPServer):
    request_queue_size = LISTEN_QUEUE
    def __init__(
        self,
        host: str,
        port: int,
        app: "WSGIApplication",
        handler: t.Optional[t.Type[WSGIRequestHandler]] = None,
        passthrough_errors: bool = False,
        ssl_context: t.Optional[_TSSLContextArg] = None,
        fd: t.Optional[int] = None,
    ) -> None:
        ...
|
- 注意BaseWSGIServer是继承自 HTTPServer 没有使用wsgiref模块
重点实现在 WSGIRequestHandler 处理请求部分:
1
2
3
4
5
6
7
8
9
|
class WSGIRequestHandler(BaseHTTPRequestHandler):
    """A request handler that implements WSGI dispatching."""

    def handle_one_request(self) -> None:
        """Handle a single HTTP request."""
        self.raw_requestline = self.rfile.readline()
        ...
        self.parse_request():
            self.run_wsgi()
|
每个请求都执行对应的WSGI实现:
 1
 2
 3
 4
 5
 6
 7
 8
 9
10
11
12
13
14
15
16
17
18
19
20
21
22
23
24
25
26
27
28
|
def run_wsgi(self) -> None:
    self.environ = environ = self.make_environ()
    status_set: t.Optional[str] = None
    headers_set: t.Optional[t.List[t.Tuple[str, str]]] = None

    def write(data: bytes) -> None:
        self.wfile.write(data)
        self.wfile.flush()

    def start_response(status, headers, exc_info=None):  # type: ignore
        nonlocal status_set, headers_set
        ...
        status_set = status
        headers_set = headers
        return write

    def execute(app: "WSGIApplication") -> None:
        application_iter = app(environ, start_response)
        try:
            for data in application_iter:
                write(data)
            if not headers_sent:
                write(b"")
        finally:
            if hasattr(application_iter, "close"):
                application_iter.close()  # type: ignore

    execute(self.server.app)
|
- 生成wsgi的environ
- 生成start_response回调方法
- 执行app,传入env和start_response回调,然后遍历执行结果,写入到wfile
make_environ主要就是将请求的数据读取转换成env:
 1
 2
 3
 4
 5
 6
 7
 8
 9
10
11
12
13
14
15
16
17
18
19
20
21
22
23
24
25
26
27
|
 def make_environ(self) -> "WSGIEnvironment":
        environ: "WSGIEnvironment" = {
            "wsgi.version": (1, 0),
            "wsgi.url_scheme": url_scheme,
            "wsgi.input": self.rfile,
            "wsgi.errors": sys.stderr,
            "wsgi.multithread": self.server.multithread,
            "wsgi.multiprocess": self.server.multiprocess,
            "wsgi.run_once": False,
            "werkzeug.server.shutdown": shutdown_server,
            "werkzeug.socket": self.connection,
            "SERVER_SOFTWARE": self.server_version,
            "REQUEST_METHOD": self.command,
            "SCRIPT_NAME": "",
            "PATH_INFO": _wsgi_encoding_dance(path_info),
            "QUERY_STRING": _wsgi_encoding_dance(request_url.query),
            # Non-standard, added by mod_wsgi, uWSGI
            "REQUEST_URI": _wsgi_encoding_dance(self.path),
            # Non-standard, added by gunicorn
            "RAW_URI": _wsgi_encoding_dance(self.path),
            "REMOTE_ADDR": self.address_string(),
            "REMOTE_PORT": self.port_integer(),
            "SERVER_NAME": self.server.server_address[0],
            "SERVER_PORT": str(self.server.server_address[1]),
            "SERVER_PROTOCOL": self.request_version,
        }
        return environ
|
request && response
request&&response分两层实现,底层在sansio包中,是纯粹的逻辑结构;上层在wrappers包中,包含了一下wsgi的实现。
sansio.Request && sansio-Response
sansio.Request的构造函数,这个类的注释比较重要,我张贴了原文:
 1
 2
 3
 4
 5
 6
 7
 8
 9
10
11
12
13
14
15
16
17
18
19
20
|
class Request:
    """Represents the non-IO parts of a HTTP request, including the
    method, URL info, and headers.

    This class is not meant for general use. It should only be used when
    implementing WSGI, ASGI, or another HTTP application spec. Werkzeug
    provides a WSGI implementation at :cls:`werkzeug.wrappers.Request`.
    """
    def __init__(
        self,
        method: str,
        scheme: str,
        server: t.Optional[t.Tuple[str, t.Optional[int]]],
        root_path: str,
        path: str,
        query_string: bytes,
        headers: Headers,
        remote_addr: t.Optional[str],
    ) -> None:
        ...
|
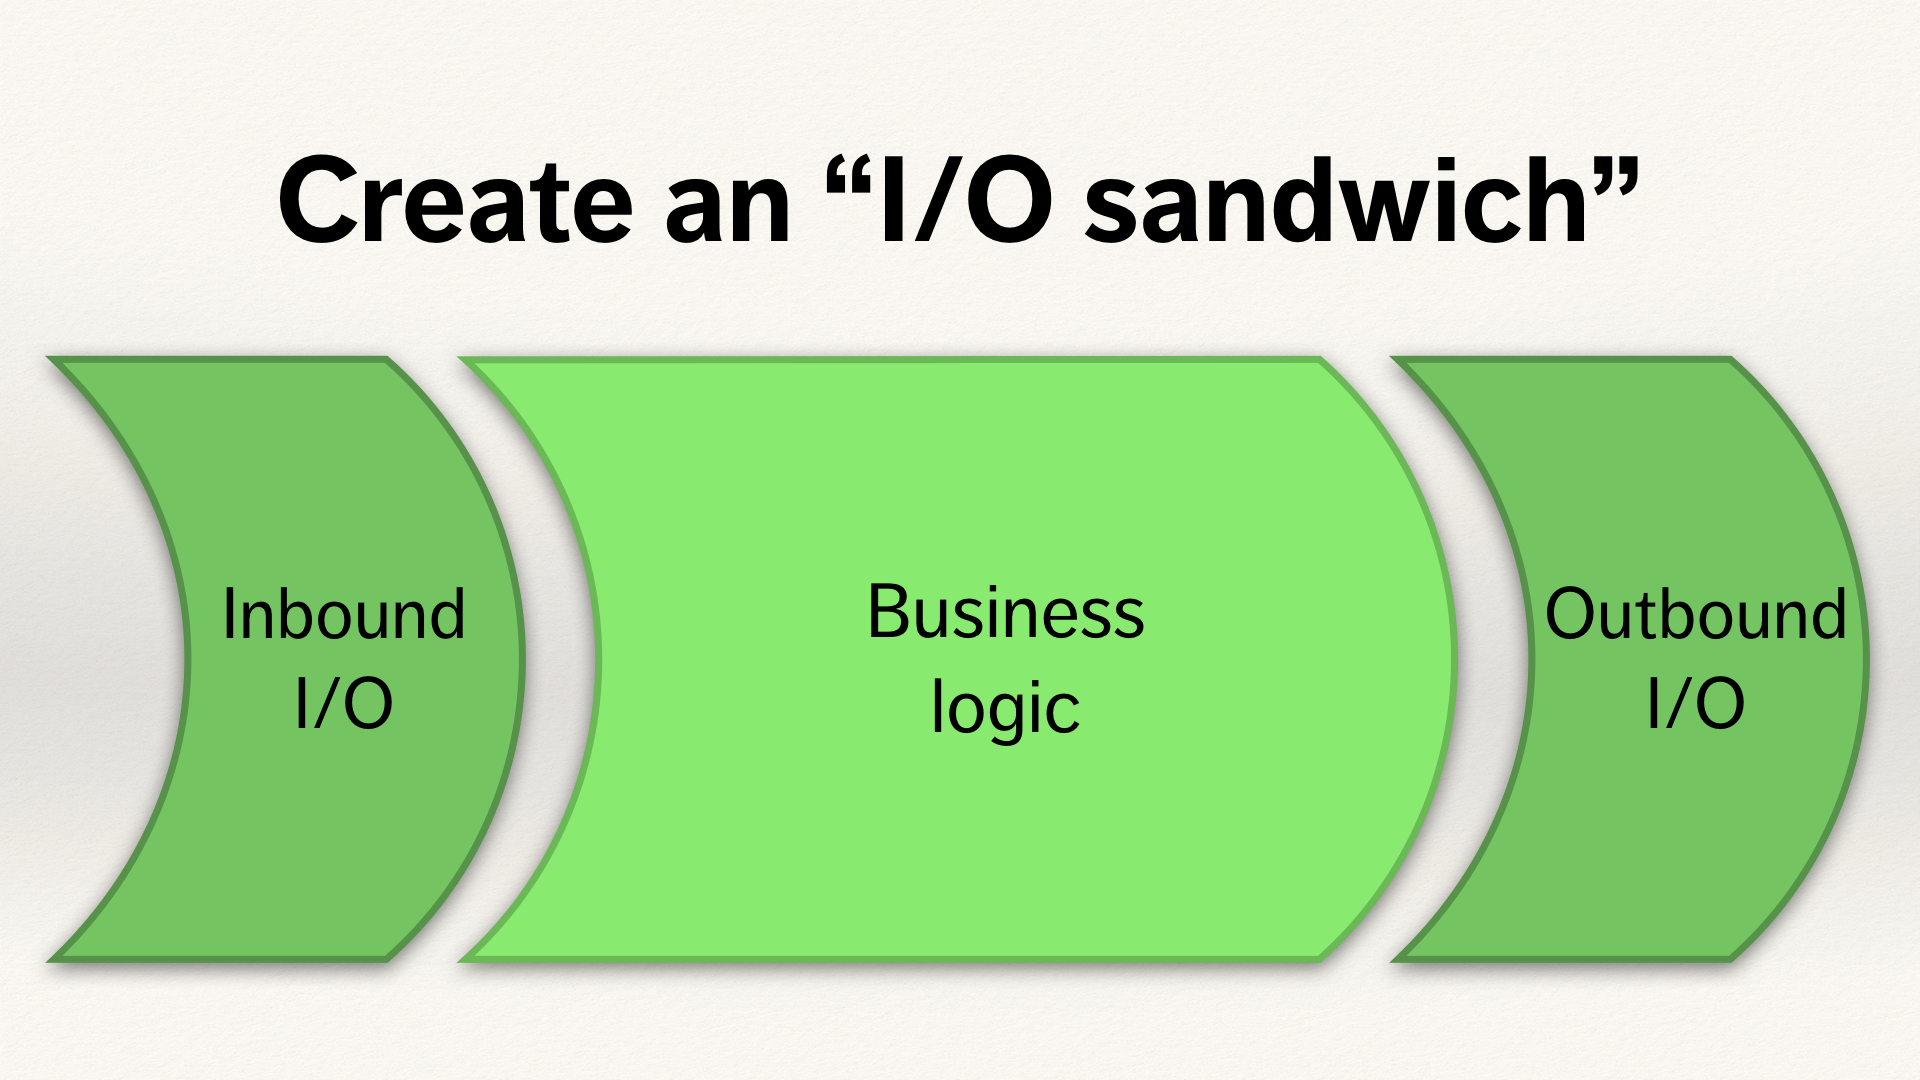
sansio.Request是non-IO理念的HTTP request实现,希望IO和逻辑像三明治(sandwich)一样,分层in-IO/业务逻辑/out-IO三层。这种方式实现的Request对象比较抽象,不涉及io和aio具体实现,比较通用,而且可以 快速测试 。如果wsgi的实现,推荐使用上层的 werkzeug.wrappers.Request。
对non-IO感兴趣的,可以查看参考链接。
sansio.Request的实现就比较简单数据模型,都是字段熟悉的取值和赋值。比较有特色的是3个实现。先是使用 cached_property 装饰器包装的属性:
1
2
3
4
|
@cached_property
def full_path(self) -> str:
    """Requested path, including the query string."""
    return f"{self.path}?{_to_str(self.query_string, self.url_charset)}"
|
结合装饰器名称和函数实现可以知道,这种属性为了提高性能,只进行一次计算后就cache住。然后是header_property方式定义的属性:
1
2
3
4
5
6
7
8
|
content_type = header_property[str](
    "Content-Type",
    doc="""The Content-Type entity-header field indicates the media
    type of the entity-body sent to the recipient or, in the case of
    the HEAD method, the media type that would have been sent had
    the request been a GET.""",
    read_only=True,
)
|
最后是 args 这个非常重要的属性,在web应用程序中一般都是使用 request.args.get("old", type=int) 获取http请求参数:
 1
 2
 3
 4
 5
 6
 7
 8
 9
10
11
12
13
14
15
16
17
18
19
|
parameter_storage_class: t.Type[MultiDict] = ImmutableMultiDict

@cached_property
def args(self) -> "MultiDict[str, str]":
    """The parsed URL parameters (the part in the URL after the question
    mark).

    By default an
    :class:`~werkzeug.datastructures.ImmutableMultiDict`
    is returned from this function.  This can be changed by setting
    :attr:`parameter_storage_class` to a different type.  This might
    be necessary if the order of the form data is important.
    """
    return url_decode(
        self.query_string,
        self.url_charset,
        errors=self.encoding_errors,
        cls=self.parameter_storage_class,
    )
|
request数据需要是不可变的,主要依赖ImmutableMultiDict的数据结构,下一篇会详细介绍一下其实现。
sansio-Response和sansio-Response比较类似:
 1
 2
 3
 4
 5
 6
 7
 8
 9
10
11
12
13
14
15
16
17
18
19
20
21
22
23
|
class Response:
    def __init__(
        self,
        status: t.Optional[t.Union[int, str, HTTPStatus]] = None,
        headers: t.Optional[
            t.Union[
                t.Mapping[str, t.Union[str, int, t.Iterable[t.Union[str, int]]]],
                t.Iterable[t.Tuple[str, t.Union[str, int]]],
            ]
        ] = None,
        mimetype: t.Optional[str] = None,
        content_type: t.Optional[str] = None,
    ) -> None:
        ...

    @property
    def status_code(self) -> int:
        """The HTTP status code as a number."""
        return self._status_code

    @status_code.setter
    def status_code(self, code: int) -> None:
        self.status = code  # type: ignore
|
wrappers.Request
wrappers部分的Request和Response相对复杂一些,我们分开来读,先看wrappers.Request:
1
2
3
4
5
6
|
class Request(_SansIORequest):
    """Represents an incoming WSGI HTTP request, with headers and body
    taken from the WSGI environment. Has properties and methods for
    using the functionality defined by various HTTP specs. The data in
    requests object is read-only.
    """
|
Request继承自sansio.Request, 注释也详细描述了其功能和特性(read-only)。
构造函数可以看到使用env构建,包括了http请求中的method,scheme,query_sring等熟悉的属性:
 1
 2
 3
 4
 5
 6
 7
 8
 9
10
11
12
13
14
15
16
17
18
19
20
21
22
|
def __init__(
        self,
        environ: "WSGIEnvironment",
        populate_request: bool = True,
        shallow: bool = False,
    ) -> None:
        super().__init__(
            method=environ.get("REQUEST_METHOD", "GET"),
            scheme=environ.get("wsgi.url_scheme", "http"),
            server=_get_server(environ),
            root_path=_wsgi_decoding_dance(
                environ.get("SCRIPT_NAME") or "", self.charset, self.encoding_errors
            ),
            path=_wsgi_decoding_dance(
                environ.get("PATH_INFO") or "", self.charset, self.encoding_errors
            ),
            query_string=environ.get("QUERY_STRING", "").encode("latin1"),
            headers=EnvironHeaders(environ),
            remote_addr=environ.get("REMOTE_ADDR"),
        )
        self.environ = environ
        ...
|
纯粹的query比较简单,我们一起看看相对复杂的form实现。业务中的form部分API大概是这样使用的:
1
2
3
4
5
6
|
def on_new_url(self, request):
    error = None
    url = ""
    if request.method == "POST":
        url = request.form["url"]
        ...
|
wrappers.Request的form也是cached_property,可以提高效率,同时form使用FormDataParser进行解析:
 1
 2
 3
 4
 5
 6
 7
 8
 9
10
11
12
13
14
15
16
17
18
19
20
21
22
23
24
25
26
27
28
|
form_data_parser_class: t.Type[FormDataParser] = FormDataParser

@cached_property
def form(self) -> "ImmutableMultiDict[str, str]":
    self._load_form_data()
    return self.form  # type: ignore

def _load_form_data(self) -> None:
    ...

    parser = self.form_data_parser_class(
            self._get_file_stream,
            self.charset,
            self.encoding_errors,
            self.max_form_memory_size,
            self.max_content_length,
            self.parameter_storage_class,
        )
    ...
    data = parser.parse(
        self._get_stream_for_parsing(),
        self.mimetype,
        self.content_length,
        self.mimetype_params,
    )

    d = self.__dict__
    d["stream"], d["form"], d["files"] = data
|
下面是FormDataParser的大概实现:
 1
 2
 3
 4
 5
 6
 7
 8
 9
10
11
12
13
|
# formparser.py

class FormDataParser
    def parse_from_environ(self, environ: "WSGIEnvironment") -> "t_parse_result":
        """Parses the information from the environment as form data.

        :param environ: the WSGI environment to be used for parsing.
        :return: A tuple in the form ``(stream, form, files)``.
        """
        content_type = environ.get("CONTENT_TYPE", "")
        content_length = get_content_length(environ)
        mimetype, options = parse_options_header(content_type)
        return self.parse(get_input_stream(environ), mimetype, content_length, options)
|
wrappers.Response
wrappers.Response和wrappers.Request类似,继承自sansio.Response:
1
2
3
4
5
6
7
8
9
|
class Response(_SansIOResponse):
    """Represents an outgoing WSGI HTTP response with body, status, and
    headers. Has properties and methods for using the functionality
    defined by various HTTP specs.
    ...
    The response object is itself a WSGI application callable. When
    called (:meth:`__call__`) with ``environ`` and ``start_response``,
    it will pass its status and headers to ``start_response`` then
    return its body as an iterable"""
|
wrappers.Response注释里也重点介绍了response的使用方法。我们通过下面的示例来了解:
 1
 2
 3
 4
 5
 6
 7
 8
 9
10
11
12
13
14
|
from werkzeug.wrappers.response import Response

def index():
    return Response("Hello, World!")

def application(environ, start_response):
    path = environ.get("PATH_INFO") or "/"

    if path == "/":
        response = index()
    else:
        response = Response("Not Found", status=404)

    return response(environ, start_response)
|
示例可以看到,每个请求生成一个Response对象,然使用environ和start_response参数执行这个对象的call方法并返回。
wrappers.Response的构造方法:
 1
 2
 3
 4
 5
 6
 7
 8
 9
10
11
12
13
14
15
16
17
18
19
20
21
22
23
24
25
26
27
28
29
|
def __init__(
        self,
        response: t.Optional[
            t.Union[t.Iterable[bytes], bytes, t.Iterable[str], str]
        ] = None,
        status: t.Optional[t.Union[int, str, HTTPStatus]] = None,
        headers: t.Optional[
            t.Union[
                t.Mapping[str, t.Union[str, int, t.Iterable[t.Union[str, int]]]],
                t.Iterable[t.Tuple[str, t.Union[str, int]]],
            ]
        ] = None,
        mimetype: t.Optional[str] = None,
        content_type: t.Optional[str] = None,
        direct_passthrough: bool = False,
    ) -> None:
        super().__init__(
            status=status,
            headers=headers,
            mimetype=mimetype,
            content_type=content_type,
        )
        ...
        if response is None:
            self.response = []
        elif isinstance(response, (str, bytes, bytearray)):
            self.set_data(response)
        else:
            self.response = response
|
重点的call方法和相关的处理函数:
 1
 2
 3
 4
 5
 6
 7
 8
 9
10
11
12
13
14
15
16
17
18
19
20
21
22
23
24
25
26
27
28
29
30
31
32
33
34
|
def __call__(
    self, environ: "WSGIEnvironment", start_response: "StartResponse"
) -> t.Iterable[bytes]:
    """Process this response as WSGI application.

    :param environ: the WSGI environment.
    :param start_response: the response callable provided by the WSGI
                           server.
    :return: an application iterator
    """
    app_iter, status, headers = self.get_wsgi_response(environ)
    start_response(status, headers)
    return app_iter

def get_app_iter(self, environ: "WSGIEnvironment") -> t.Iterable[bytes]:
    status = self.status_code
    if (
        environ["REQUEST_METHOD"] == "HEAD"
        or 100 <= status < 200
        or status in (204, 304)
    ):
        iterable: t.Iterable[bytes] = ()
    elif self.direct_passthrough:
        return self.response  # type: ignore
    else:
        iterable = self.iter_encoded()
    return ClosingIterator(iterable, self.close)

def get_wsgi_response(
    self, environ: "WSGIEnvironment"
) -> t.Tuple[t.Iterable[bytes], str, t.List[t.Tuple[str, str]]]:
    headers = self.get_wsgi_headers(environ)
    app_iter = self.get_app_iter(environ)
    return app_iter, self.status, headers.to_wsgi_list()
|
主要就是将wsgi的Response转换成status,header和结果的迭代器给wsgi-server。
local实现
local是“德国锤子”非常重要的模块。先看看标准的 threading.local 实现示例:
 1
 2
 3
 4
 5
 6
 7
 8
 9
10
11
12
13
14
15
16
17
18
19
20
21
22
23
24
25
26
27
28
29
|
import threading
import logging
import random

logging.basicConfig(level=logging.DEBUG,
                    format='(%(threadName)-0s) %(message)s',)

def show(d):
    try:
        val = d.val
    except AttributeError:
        logging.debug('No value yet')
    else:
        logging.debug('value=%s', val)

def f(d):
    show(d)
    d.val = random.randint(1, 100)
    show(d)

if __name__ == '__main__':
    d = threading.local()
    show(d)
    d.val = 999
    show(d)

    for i in range(2):
        t = threading.Thread(target=f, args=(d,))
        t.start()
|
测试结果可以看到不同的线程,同一个变量d的值是不一样的:
1
2
3
4
5
6
|
(MainThread) No value yet
(MainThread) value=999
(Thread-1) No value yet
(Thread-1) value=56
(Thread-2) No value yet
(Thread-2) value=38
|
threading.local 主要是解决2个问题:
- 线程之间数据隔离
- 代码书写的简单,只需要定义一个变量
实际上要做到线程隔离,自己用一个字典就可以,比如每个线程的值加上线程ID作为key去区分。“德国锤子”的local正是使用这个思路。同时还为了支持 greenlet 也就是协程的实现,所以实现了一个新的local,没有直接使用 threading.local 。
1
2
3
4
|
try:
    from greenlet import getcurrent as _get_ident
except ImportError:
    from threading import get_ident as _get_ident
|
其中threading.get_ident的官方文档如下:
threading.get_ident()
返回当前线程的 “线程标识符”。它是一个非零的整数。它的值没有直接含义,主要是用作 magic cookie,比如作为含有线程相关数据的字典的索引。线程标识符可能会在线程退出,新线程创建时被复用。
3.3 新版功能.
local的基础是ContextVar类:
 1
 2
 3
 4
 5
 6
 7
 8
 9
10
11
12
13
14
|
class ContextVar:  # type: ignore
    """A fake ContextVar based on the previous greenlet/threading
    ident function. Used on Python 3.6, eventlet, and old versions
    of gevent.
    """

    def __init__(self, _name: str) -> None:
        self.storage: t.Dict[int, t.Dict[str, t.Any]] = {}

    def get(self, default: t.Dict[str, t.Any]) -> t.Dict[str, t.Any]:
        return self.storage.get(_get_ident(), default)

    def set(self, value: t.Dict[str, t.Any]) -> None:
        self.storage[_get_ident()] = value
|
- ContextVar 定义了一个二级结构的字典,其中一级key是线程/协程的标识,这样就做到线程/协程的数据隔离。
Local的实现主要是一个 _storage 属性使用ContextVar对象:
 1
 2
 3
 4
 5
 6
 7
 8
 9
10
11
12
13
14
15
16
17
|
class Local:
    __slots__ = ("_storage",)

    def __init__(self) -> None:
        object.__setattr__(self, "_storage", ContextVar("local_storage"))

    def __getattr__(self, name: str) -> t.Any:
        values = self._storage.get({})
        try:
            return values[name]
        except KeyError:
            raise AttributeError(name)

    def __setattr__(self, name: str, value: t.Any) -> None:
        values = self._storage.get({}).copy()
        values[name] = value
        self._storage.set(values)
|
- 需要注意的是这里每次设置值的时候是copy后再修改(why?欢迎互动探讨)。
使用Local实现了一个简单的栈:
 1
 2
 3
 4
 5
 6
 7
 8
 9
10
11
12
13
14
15
16
17
18
19
20
21
22
23
|
class LocalStack
    def __init__(self) -> None:
        self._local = Local()

    def push(self, obj: t.Any) -> t.List[t.Any]:
        """Pushes a new item to the stack"""
        rv = getattr(self._local, "stack", []).copy()
        rv.append(obj)
        self._local.stack = rv
        return rv  # type: ignore

    def pop(self) -> t.Any:
        """Removes the topmost item from the stack, will return the
        old value or `None` if the stack was already empty.
        """
        stack = getattr(self._local, "stack", None)
        if stack is None:
            return None
        elif len(stack) == 1:
            release_local(self._local)
            return stack[-1]
        else:
            return stack.pop()
|
LocalManager用来管理所有的local数据,重点就是清理数据:
 1
 2
 3
 4
 5
 6
 7
 8
 9
10
11
12
13
14
15
16
17
18
19
20
21
22
23
24
25
26
27
|
class LocalManager:
    """Local objects cannot manage themselves. For that you need a local
    manager. You can pass a local manager multiple locals or add them
    later y appending them to `manager.locals`. Every time the manager
    cleans up, it will clean up all the data left in the locals for this
    context
    """

    def __init__(
        self,
        locals: t.Optional[t.Iterable[t.Union[Local, LocalStack]]] = None,
        ident_func: None = None,
    ) -> None:
        if locals is None:
            self.locals = []
        elif isinstance(locals, Local):
            self.locals = [locals]
        else:
            self.locals = list(locals)
        ...

    def cleanup(self) -> None:
        """Manually clean up the data in the locals for this context.  Call
        this at the end of the request or use `make_middleware()`.
        """
        for local in self.locals:
            release_local(local)
|
local怎么使用呢?使用单例,下面是flask中的示例:
1
2
3
4
|
# flask-globals
# context locals
_request_ctx_stack = LocalStack()
_app_ctx_stack = LocalStack()
|
_request_ctx_stack就是一个线程安全的全局变量,在业务处理中随处可以读取,不用将数据传来传去。
原创不易,欢迎加下面的微信和我互动交流,一起进阶:

参考链接