本次代码阅读的项目来自 500lines 的子项目 web-server。 500 Lines or Less不仅是一个项目,也是一本同名书,有源码,也有文字介绍。这个项目由多个独立的章节组成,每个章节由领域大牛试图用 500 行或者更少(500 or less)的代码,让读者了解一个功能或需求的简单实现。本文包括下面几个部分:
- 导读
- 项目结构介绍
- 简易HTTP服务
- echo服务
- 文件服务
- 文件目录服务和cgi服务
- 服务重构
- 小结
- 小技巧
导读
我们之前已经埋头阅读了十二个项目的源码,是时候空谈一下如何阅读源码了。
python项目很多,优秀的也不少。学习这些项目的源码,可以让我们更深入的理解API,了解项目的实现原理和细节。仅仅会用项目API,并不符合有进阶之心的你我。个人觉得看书,做题和重复照轮子,都不如源码阅读。我们学习的过程,就是从模仿到创造的过程,看优秀的源码,模仿它,从而超越它。
选择合适项目也需要一定的技巧,这里讲讲我的方法:
- 项目小巧一点,刚开始的时候功力有限,代码量小的项目,更容易读下去。初期阶段的项目,建议尽量在5000行以下。
- 项目纵向贯穿某个方向,逐步的打通整个链条。比如围绕http服务的不同阶段,我们阅读了gunicorn,wsgi,http-server,bottle,mako。从服务到WSGI规范,从web框架到模版引擎。
- 项目横行可以对比,比如CLI部分,对比getopt和argparse;比如blinker和flask/django-signal的差别。
选择好项目后,就是如何阅读源码了。我们之前的代码阅读方法我称之为:概读法 。具体的讲就是根据项目的主要功能,仅分析其核心实现,对于辅助的功能,增强的功能可以暂时不用理会,避免陷入太多细节。简单举个例子: “研表究明,汉字的序顺并不定一影阅响读,比如你看完这句话后才发现这里的字全是乱的”,我们了解项目主要的功能,就可以初步达到目的。
哈哈,愚人节快乐
概读法,有一个弊端:我们知道代码是这样实现的,但是无法解读为什么这样实现?所以是时候介绍一下另外一种代码阅读方法:历史对比法。历史对比法主要是对比代码的需求变化和版本历史,从而学习需求如何被实现。一般项目中,使用gitlog种的commit
-message来展现历史和需求。本篇的500lines-webserver项目中直接提供了演化示例,用来演示历史对比法再适合不过。
项目结构
本次代码阅读是用的版本是 fba689d1 , 项目目录结构如下表:
| 目录 |
描述 |
| 00-hello-web |
简易http服务 |
| 01-echo-request-info |
可以显示请求的http服务 |
| 02-serve-static |
静态文件服务 |
| 03-handlers |
支持目录展现的http文件服务 |
| 04-cgi |
cgi实现 |
| 05-refactored |
重构http服务 |
简易HTTP服务
http服务非常简单,这样启动服务:
1
2
3
|
serverAddress = ('', 8080)
server = BaseHTTPServer.HTTPServer(serverAddress, RequestHandler)
server.serve_forever()
|
只响应get请求的Handler:
 1
 2
 3
 4
 5
 6
 7
 8
 9
10
|
class RequestHandler(BaseHTTPServer.BaseHTTPRequestHandler):

    ...

    def do_GET(self):
        self.send_response(200)
        self.send_header("Content-type", "text/html")
        self.send_header("Content-Length", str(len(self.Page)))
        self.end_headers()
        self.wfile.write(self.Page)
|
服务的效果,可以配合下面的请求示例:
 1
 2
 3
 4
 5
 6
 7
 8
 9
10
11
12
13
14
15
16
17
18
19
20
21
22
|
# curl -v http://127.0.0.1:8080
*   Trying 127.0.0.1...
* TCP_NODELAY set
* Connected to 127.0.0.1 (127.0.0.1) port 8080 (#0)
> GET / HTTP/1.1
> Host: 127.0.0.1:8080
> User-Agent: curl/7.64.1
> Accept: */*
>
* HTTP 1.0, assume close after body
< HTTP/1.0 200 OK
< Server: BaseHTTP/0.3 Python/2.7.16
< Date: Wed, 31 Mar 2021 11:57:03 GMT
< Content-type: text/html
< Content-Length: 49
<
<html>
<body>
<p>Hello, web!</p>
</body>
</html>
* Closing connection 0
|
本文不打算详细介绍http协议细节的实现,如果想了解http协议细节的请看第2篇博文,或者我之前的[python http 源码阅读]
echo服务
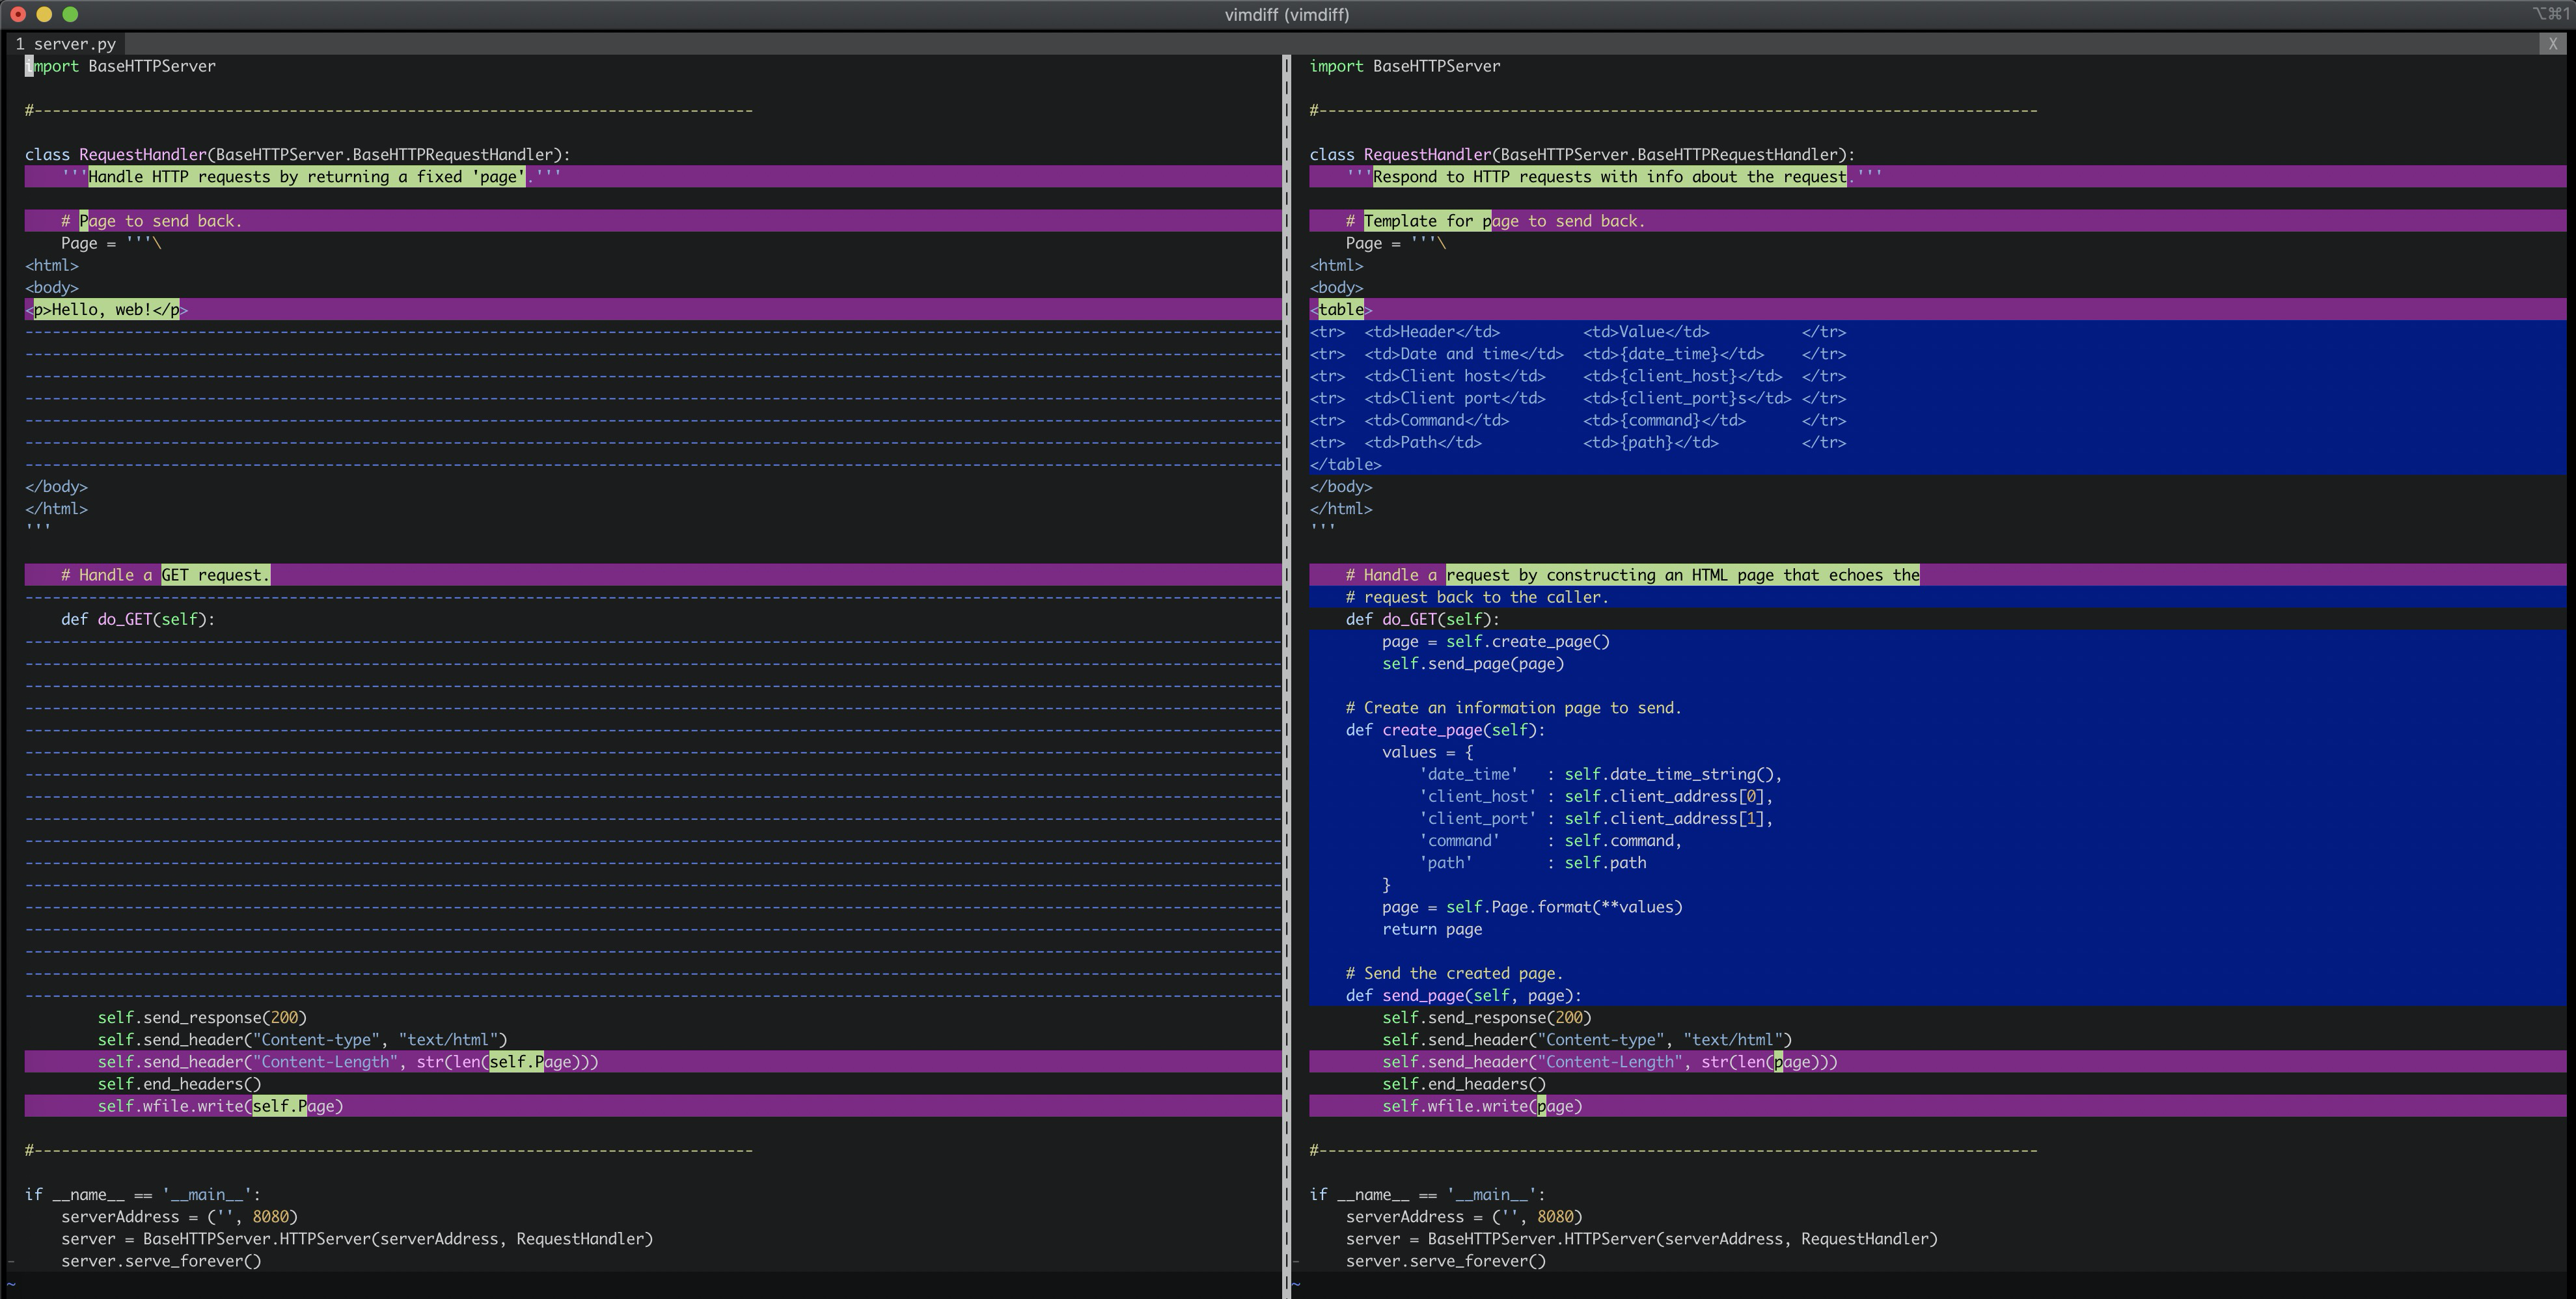
echo服务是在简易http服务上演进的,支持对用户的请求回声。所以我们对比一下2个文件,就知道更改了哪些内容:

更改的重点在 do_GET 的实现,图片可能不太清晰,我把代码贴在下面:
 1
 2
 3
 4
 5
 6
 7
 8
 9
10
|
# hello
def do_GET(self):
    self.send_response(200)
    ...
    self.wfile.write(self.Page)

# echo
def do_GET(self):
    page = self.create_page()
    self.send_page(page)
|
可以看到echo的 do_GET 中调用了 create_page 和 send_page 2个方法 。短短两行代码,非常清晰的显示了echo和hello的差异。因为echo要获取客户端请求并原样输出,固定的页面肯定部满足需求。需要先使用模版创建页面,再发送页面给用户。hello的 do_GET 方法的实现重构成send_page函数的主体,新增的create_page就非常简单:
 1
 2
 3
 4
 5
 6
 7
 8
 9
10
|
def create_page(self):
    values = {
        'date_time'   : self.date_time_string(),
        'client_host' : self.client_address[0],
        'client_port' : self.client_address[1],
        'command'     : self.command,
        'path'        : self.path
    }
    page = self.Page.format(**values)
    return page
|
单看echo的代码,会觉得平淡无奇。对比了hello和echo的差异,才能够感受到大师的手艺。代码展示了如何写出可读的代码和如何实现新增需求:
- create-page和send-page函数名称清晰可读,可以望文生义。
- create和send的逻辑自然平等。举个反例:更改成函数名称为create_page和_do_GET,功能不变,大家就会觉得别扭。
- hello中的do_GET函数的5行实现代码完全没变,只是重构成新的send_page函数。这样从测试角度,只需要对变化的部分(create_page)增加测试用例。
对比是用的命令是 vimdiff 00-hello-web/server.py 01-echo-request-info/server.py 也可以是用ide提供的对比工具。
文件服务
文件服务可以展示服务本地html页面:
 1
 2
 3
 4
 5
 6
 7
 8
 9
10
11
12
13
14
15
16
17
18
19
20
|
 # Classify and handle request.
def do_GET(self):
    try:

        # Figure out what exactly is being requested.
        full_path = os.getcwd() + self.path

        # 文件不存在
        if not os.path.exists(full_path):
            raise ServerException("'{0}' not found".format(self.path))

        # 处理html文件
        elif os.path.isfile(full_path):
            self.handle_file(full_path)

        ...

    # 处理异常
    except Exception as msg:
        self.handle_error(msg)
|
文件和异常的处理:
 1
 2
 3
 4
 5
 6
 7
 8
 9
10
11
12
|
def handle_file(self, full_path):
    try:
        with open(full_path, 'rb') as reader:
            content = reader.read()
        self.send_content(content)
    except IOError as msg:
        msg = "'{0}' cannot be read: {1}".format(self.path, msg)
        self.handle_error(msg)

def handle_error(self, msg):
    content = self.Error_Page.format(path=self.path, msg=msg)
    self.send_content(content)
|
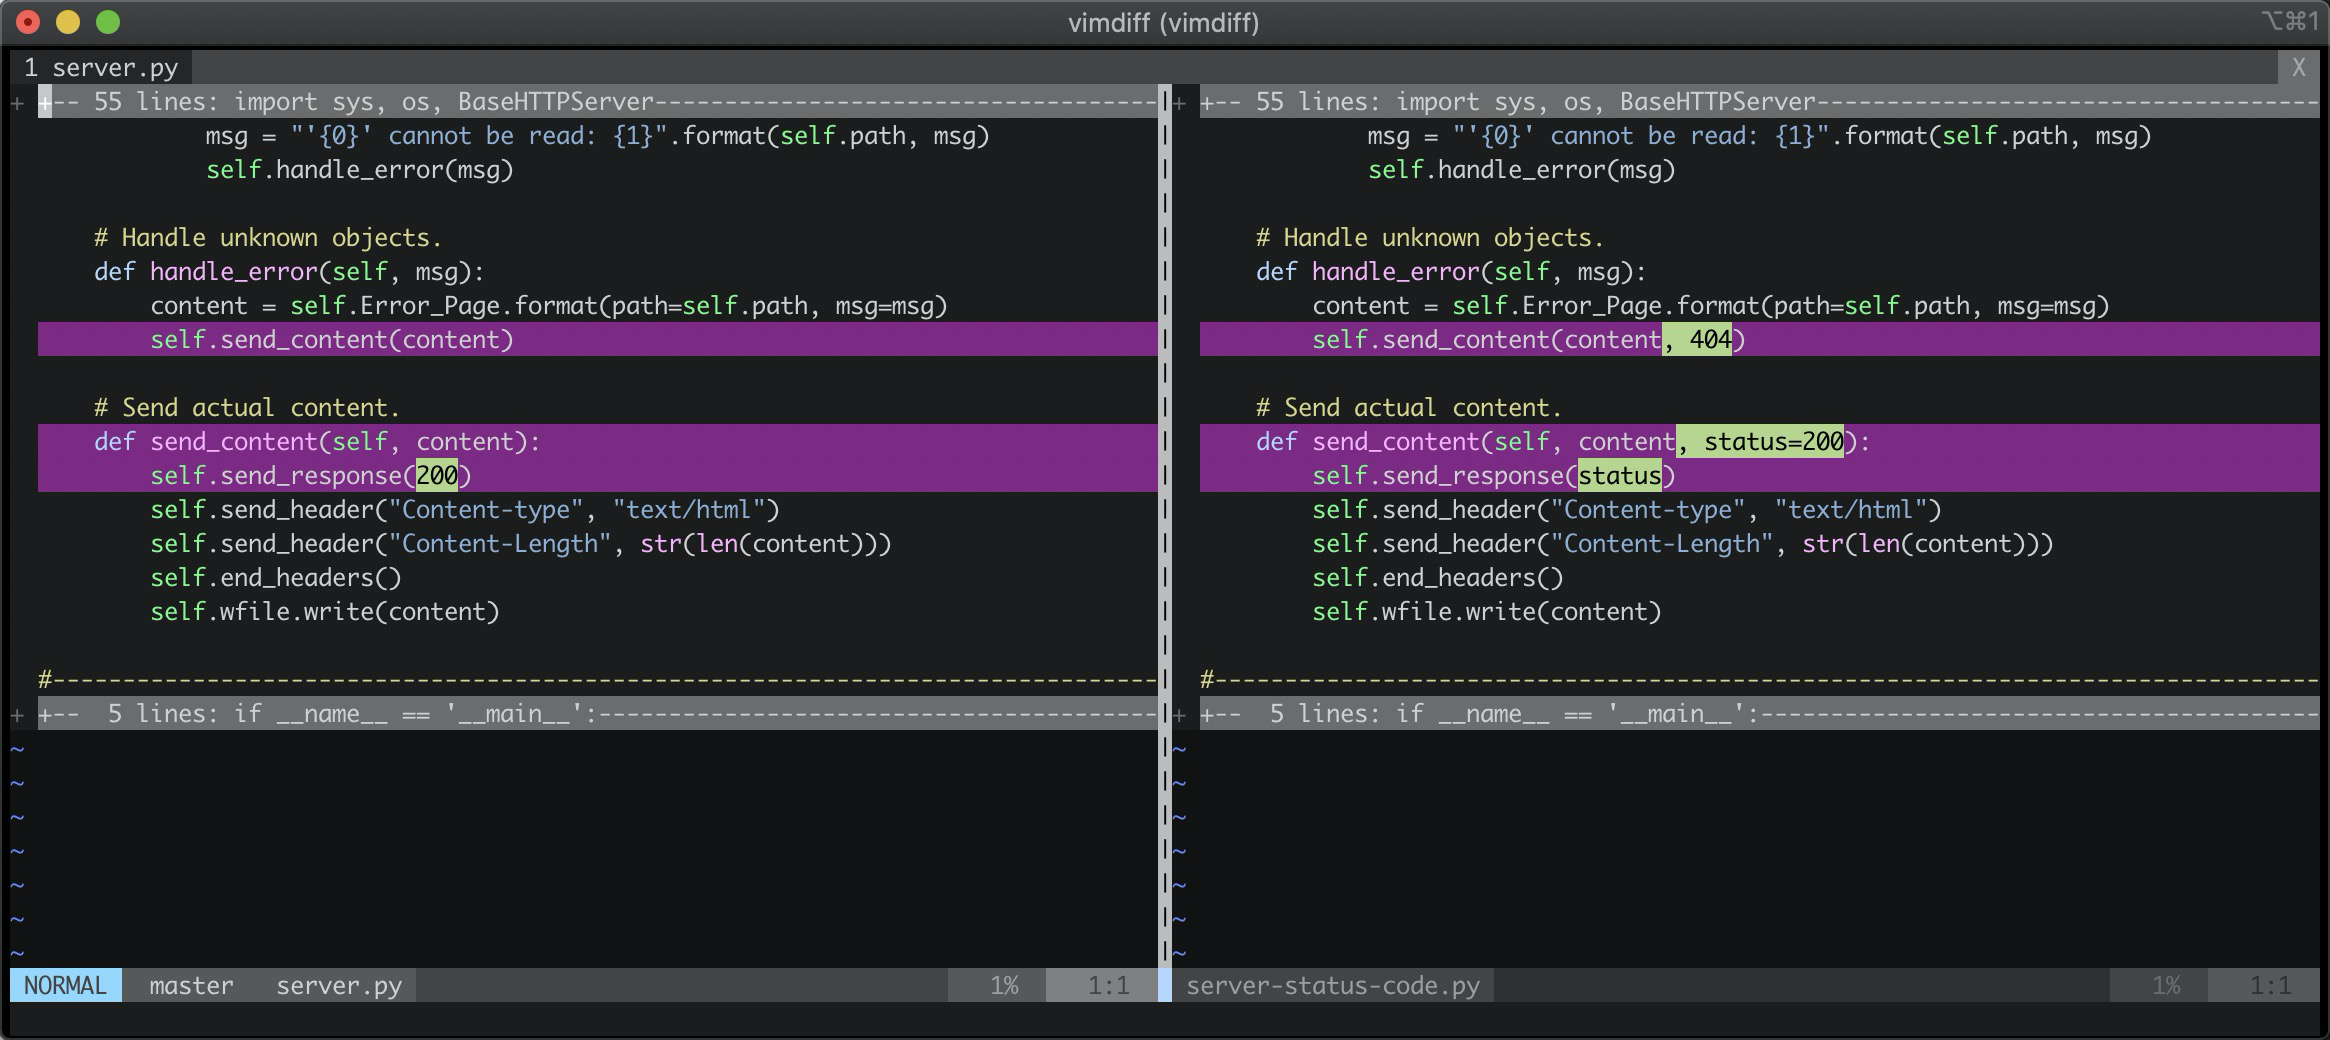
目录下还提供了一个status-code的版本,一样对比一下:

如果文件不存在,按照http协议规范,应该报404错误:
1
2
3
4
5
6
7
|
def handle_error(self, msg):
    content = ...
    self.send_content(content, 404)

def send_content(self, content, status=200):
    self.send_response(status)
    ...
|
这里利用了python函数参数支持默认值的特性,让send_content函数稳定下来,即使后续有30x/50x错误,也不用修改send_content函数。
文件目录服务和CGI服务
文件服务需要升级支持文件目录。通常如果一个目录下有index.html就展示该文件;没有该文件,就显示目录列表,方便使用者查看,不用手工输入文件名称。
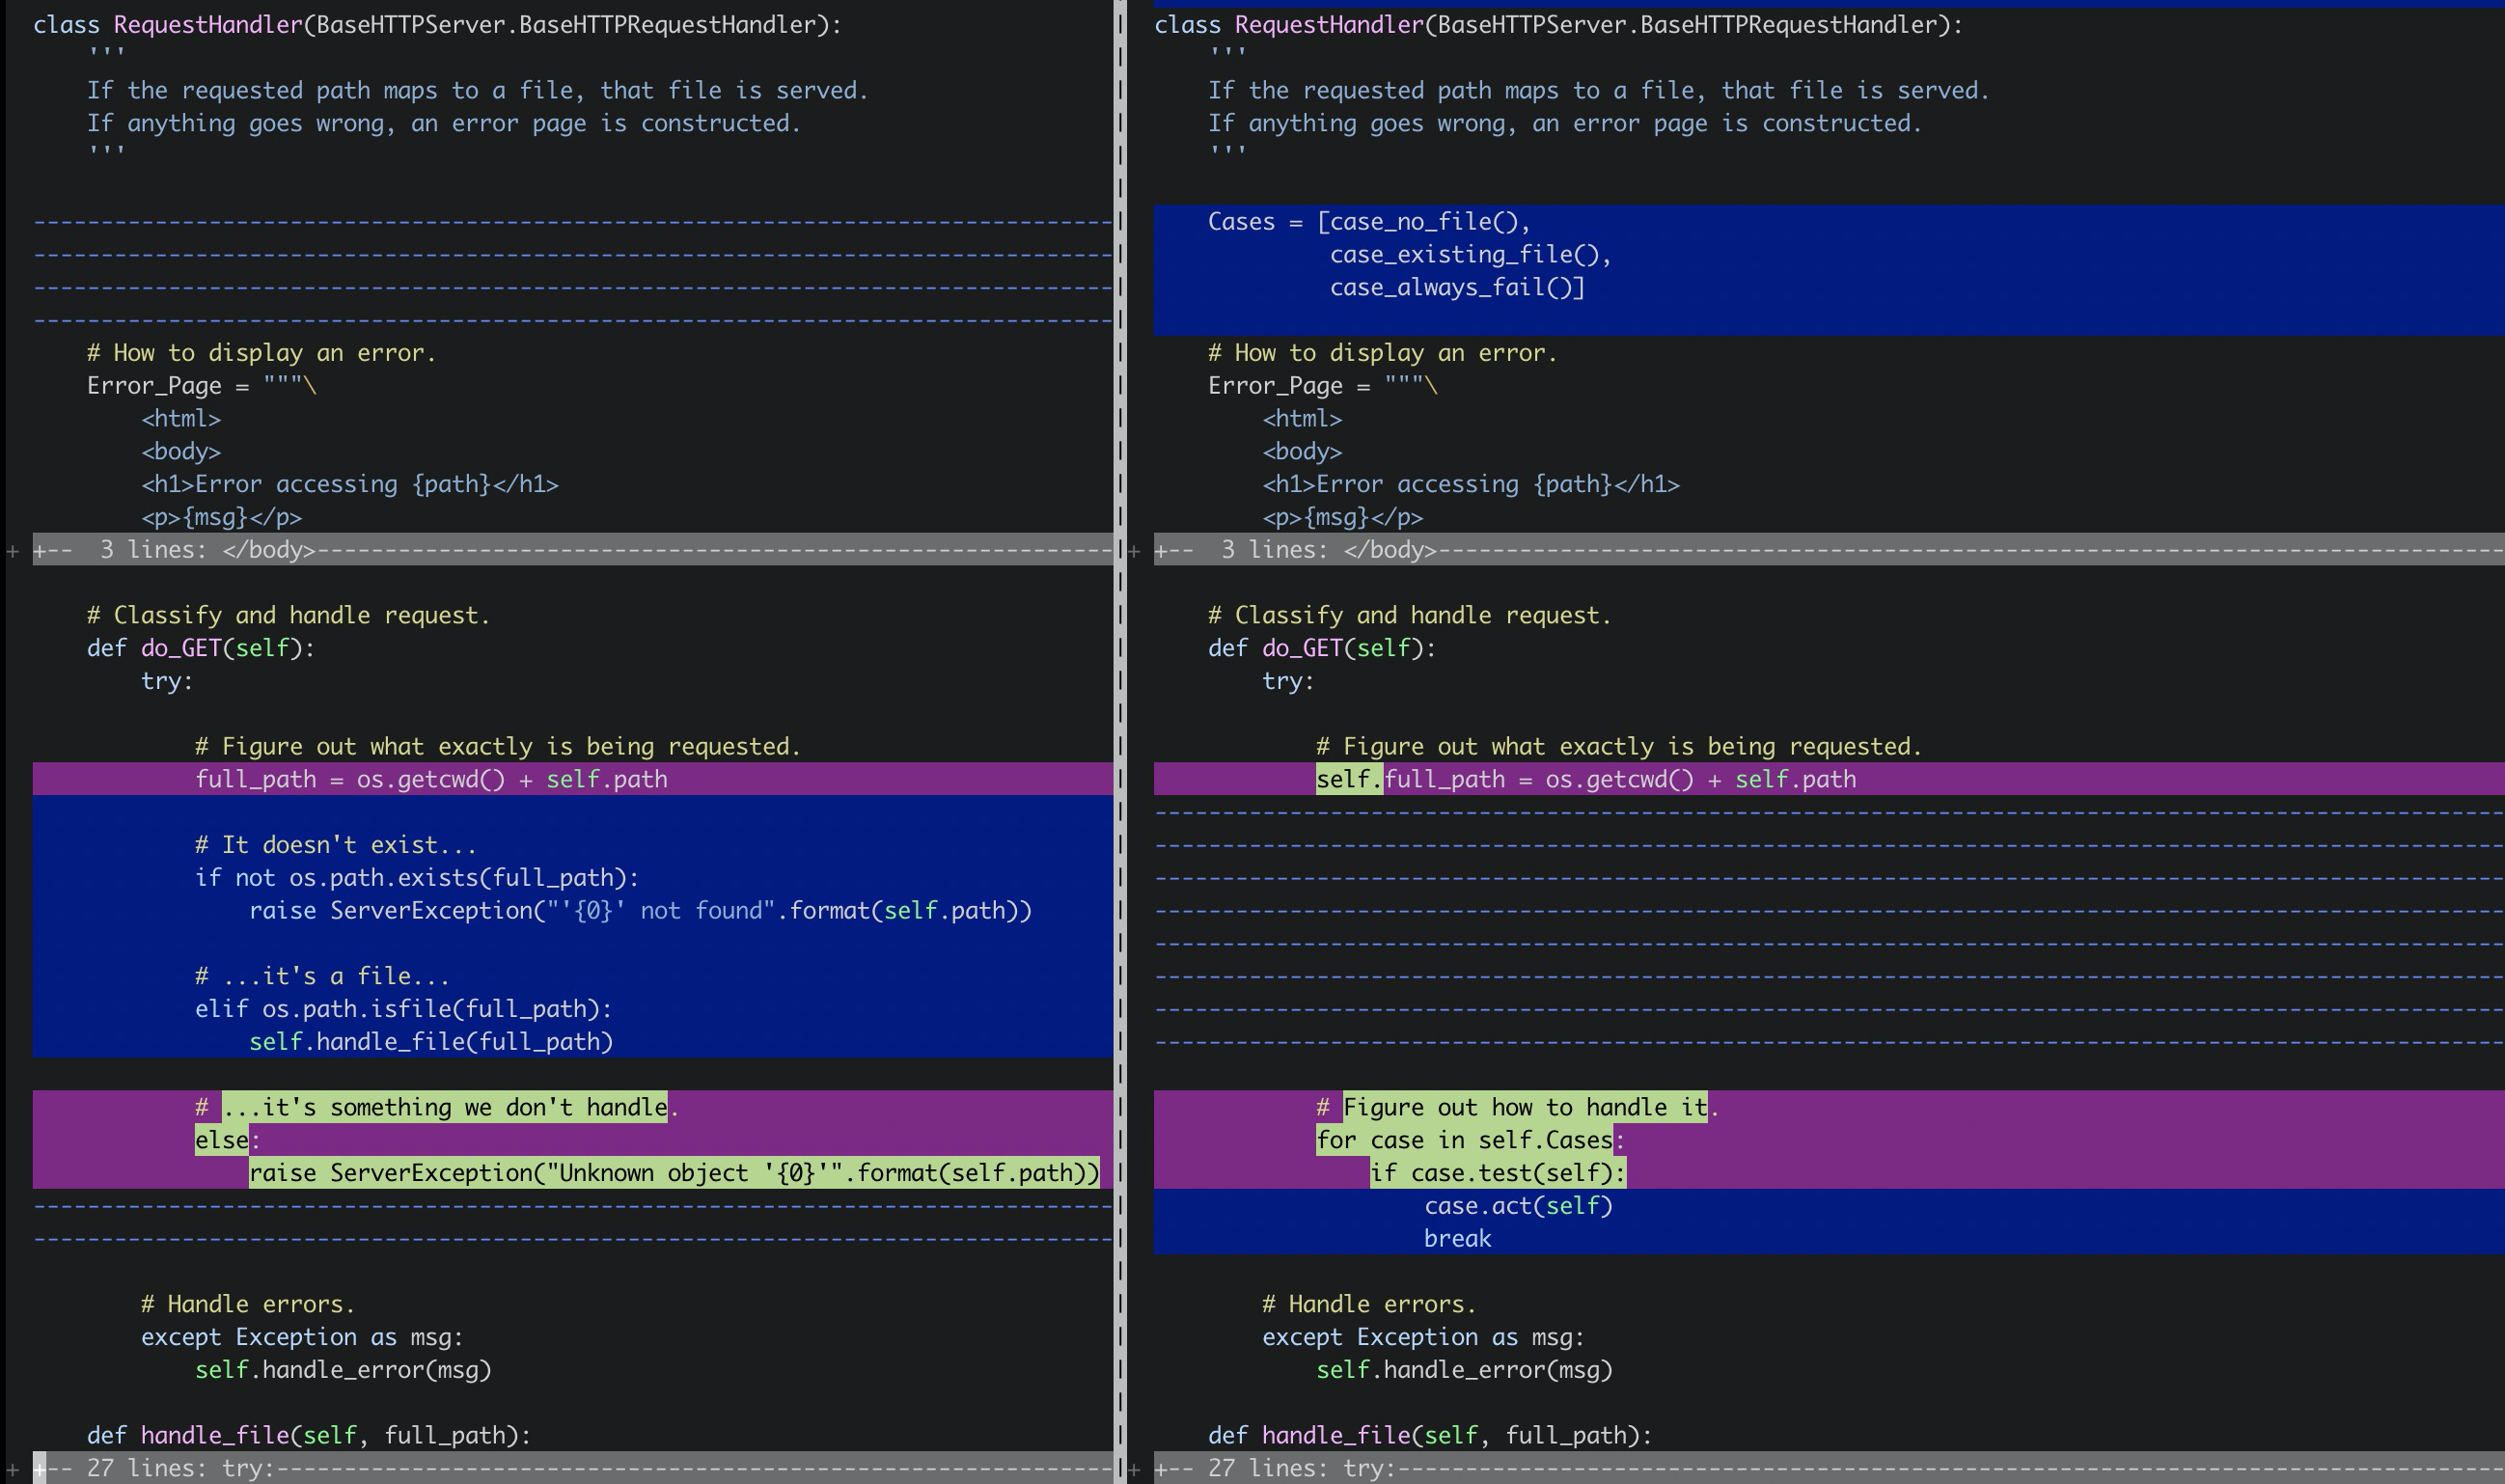
同样我把版本的迭代对比成下图,主要展示RequestHandler的变化:

do_GET要处理三种逻辑:html文件,目录和错误。如果继续用if-else方式就会让代码丑陋,也不易扩展,所以这里使用策略模式进行了扩展:
 1
 2
 3
 4
 5
 6
 7
 8
 9
10
11
12
13
14
15
16
17
18
19
20
21
22
|
# 有序的策略
Cases = [case_no_file(),
         case_existing_file(),
         case_always_fail()]


# Classify and handle request.
def do_GET(self):
    try:

        # Figure out what exactly is being requested.
        self.full_path = os.getcwd() + self.path

        # 选择策略
        for case in self.Cases:
            if case.test(self):
                case.act(self)
                break

    # Handle errors.
    except Exception as msg:
        self.handle_error(msg)
|
html,文件不存在和异常的3种策略实现:
 1
 2
 3
 4
 5
 6
 7
 8
 9
10
11
12
13
14
15
16
17
18
19
20
21
22
23
24
25
26
|
class case_no_file(object):
    '''File or directory does not exist.'''

    def test(self, handler):
        return not os.path.exists(handler.full_path)

    def act(self, handler):
        raise ServerException("'{0}' not found".format(handler.path))

class case_existing_file(object):
    '''File exists.'''

    def test(self, handler):
        return os.path.isfile(handler.full_path)

    def act(self, handler):
        handler.handle_file(handler.full_path)

class case_always_fail(object):
    '''Base case if nothing else worked.'''

    def test(self, handler):
        return True

    def act(self, handler):
        raise ServerException("Unknown object '{0}'".format(handler.path))
|
目录的实现就很简单了,再扩展一下 case_directory_index_file 和 case_directory_no_index_file 策略即可; cgi 的支持也一样,增加一个 case_cgi_file 策略。
1
2
3
4
5
6
7
8
|
class case_directory_index_file(object):
    ...

class case_directory_no_index_file(object):
    ...

class case_cgi_file(object):
    ...
|
服务重构
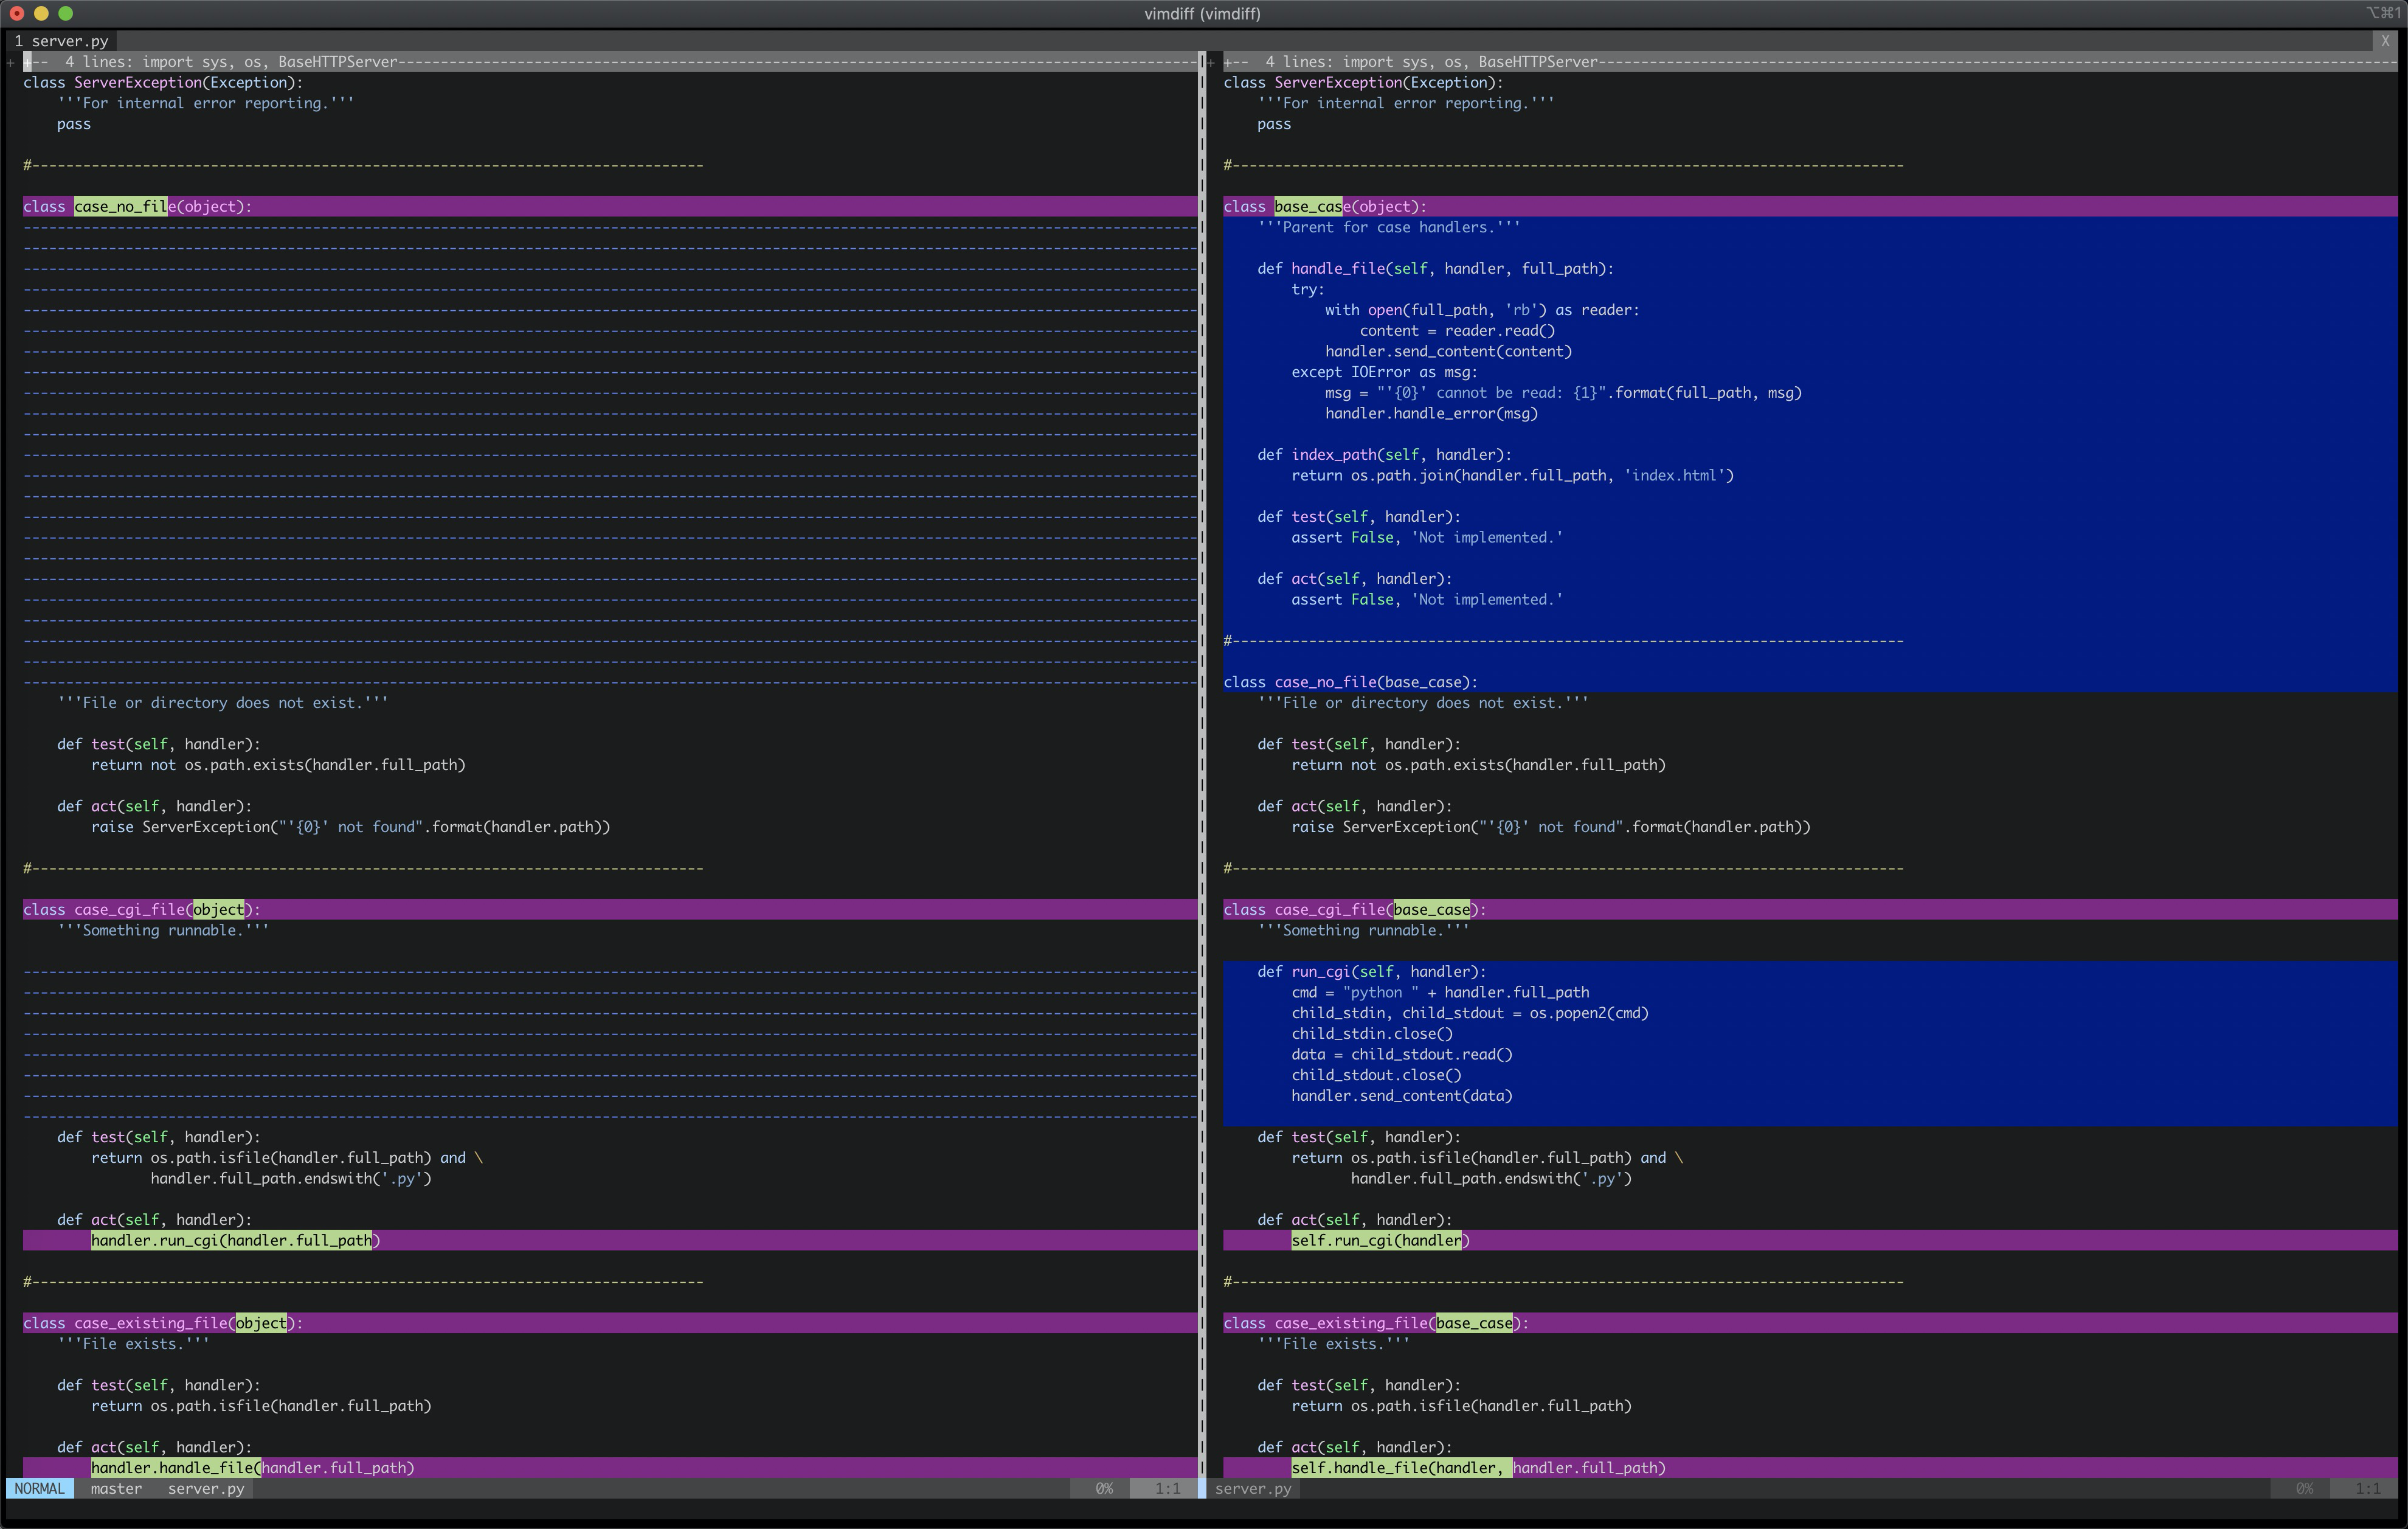
实现功能后,作者对代码进行了一次重构:

重构后RequestHandler代码简洁了很多,只包含http协议细节的处理。handle_error处理异常,返回404错误;send_content生成http的响应。
 1
 2
 3
 4
 5
 6
 7
 8
 9
10
11
12
13
14
15
16
17
18
19
20
21
22
23
24
25
26
27
28
29
30
31
|
class RequestHandler(BaseHTTPServer.BaseHTTPRequestHandler):

    # Classify and handle request.
    def do_GET(self):
        try:

            # Figure out what exactly is being requested.
            self.full_path = os.getcwd() + self.path

            # Figure out how to handle it.
            for case in self.Cases:
                if case.test(self):
                    case.act(self)
                    break

        # Handle errors.
        except Exception as msg:
            self.handle_error(msg)

    # Handle unknown objects.
    def handle_error(self, msg):
        content = self.Error_Page.format(path=self.path, msg=msg)
        self.send_content(content, 404)

    # Send actual content.
    def send_content(self, content, status=200):
        self.send_response(status)
        self.send_header("Content-type", "text/html")
        self.send_header("Content-Length", str(len(content)))
        self.end_headers()
        self.wfile.write(content)
|
请求处理策略也进行了重构,构建了base_case父类,约定了处理的模版和步骤,并且默认提供了html文件的读取办法。
 1
 2
 3
 4
 5
 6
 7
 8
 9
10
11
12
13
14
15
16
17
18
19
20
|
class base_case(object):
    '''Parent for case handlers.'''

    def handle_file(self, handler, full_path):
        try:
            with open(full_path, 'rb') as reader:
                content = reader.read()
            handler.send_content(content)
        except IOError as msg:
            msg = "'{0}' cannot be read: {1}".format(full_path, msg)
            handler.handle_error(msg)

    def index_path(self, handler):
        return os.path.join(handler.full_path, 'index.html')

    def test(self, handler):
        assert False, 'Not implemented.'

    def act(self, handler):
        assert False, 'Not implemented.'
|
html文件的处理函数就很简单,实现判断函数和执行函数,其中执行函数还是还复用父类的html处理函数。
1
2
3
4
5
6
7
8
|
class case_existing_file(base_case):
    '''File exists.'''

    def test(self, handler):
        return os.path.isfile(handler.full_path)

    def act(self, handler):
        self.handle_file(handler, handler.full_path)
|
策略最长就是不存在index.html页面的目录:
 1
 2
 3
 4
 5
 6
 7
 8
 9
10
11
12
13
14
15
16
17
18
19
20
21
22
23
24
25
26
27
28
29
30
|
class case_directory_no_index_file(base_case):
    '''Serve listing for a directory without an index.html page.'''

    # How to display a directory listing.
    Listing_Page = '''\
        <html>
        <body>
        <ul>
        {0}
        </ul>
        </body>
        </html>
        '''

    def list_dir(self, handler, full_path):
        try:
            entries = os.listdir(full_path)
            bullets = ['<li>{0}</li>'.format(e) for e in entries if not e.startswith('.')]
            page = self.Listing_Page.format('\n'.join(bullets))
            handler.send_content(page)
        except OSError as msg:
            msg = "'{0}' cannot be listed: {1}".format(self.path, msg)
            handler.handle_error(msg)

    def test(self, handler):
        return os.path.isdir(handler.full_path) and \
               not os.path.isfile(self.index_path(handler))

    def act(self, handler):
        self.list_dir(handler, handler.full_path)
|
list_dir动态生成一个文件目录列表的html文件。
小结
我们一起使用历史对比法,阅读了500lines-webserver的代码演进过程,清晰的了解如何一步一步的实现一个文件目录服务。
- RequestHandler的do_GET方法处理http请求
- 使用send_content输出response,包括状态码,响应头和body。
- 读取html文件展示html页面
- 展示目录
- 支持cgi
在学习过程中,我们还额外获得了如何扩充代码,编写可维护代码和重构代码示例,希望大家和我一样有所收获。
小技巧
前面介绍了,请求的处理使用策略模式。可以先看看来自python-patterns项目的策略模式实现:
 1
 2
 3
 4
 5
 6
 7
 8
 9
10
11
12
13
14
15
16
17
18
19
20
21
22
23
24
25
26
27
28
29
30
31
32
33
34
35
36
|
class Order:
    def __init__(self, price, discount_strategy=None):
        self.price = price
        self.discount_strategy = discount_strategy

    def price_after_discount(self):
        if self.discount_strategy:
            discount = self.discount_strategy(self)
        else:
            discount = 0
        return self.price - discount

    def __repr__(self):
        fmt = "<Price: {}, price after discount: {}>"
        return fmt.format(self.price, self.price_after_discount())


def ten_percent_discount(order):
    return order.price * 0.10


def on_sale_discount(order):
    return order.price * 0.25 + 20


def main():
    """
    >>> Order(100)
    <Price: 100, price after discount: 100>

    >>> Order(100, discount_strategy=ten_percent_discount)
    <Price: 100, price after discount: 90.0>

    >>> Order(1000, discount_strategy=on_sale_discount)
    <Price: 1000, price after discount: 730.0>
    """
|
ten_percent_discount提供9折,on_sale_discount提供75折再减20的优惠。不同的订单可以使用不同的折扣模式,比如示例调整成下面:
1
2
3
4
5
6
7
8
9
|
order_amount_list = [80, 100, 1000]
for amount in order_amount_list:
    if amount < 100:
        Order(amount)
        break;
    if amount < 1000:
        Order(amount, discount_strategy=ten_percent_discount)
        break;
    Order(amount, discount_strategy=on_sale_discount)
|
对应的业务逻辑是:
- 订单金额小于100不打折
- 订单金额小于1000打9折
- 订单金额大于等于1000打75折并优惠20
如果我们把打折的条件和折扣方式实现在一个类中,那就和web-server类似:
1
2
3
4
5
6
7
8
9
|
class case_discount(object):

    def test(self, handler):
        # 打折条件
        ...

    def act(self, handler):
        # 计算折扣
        ...
|
参考链接


