Werkzeug是一个全面的WSGI Web应用程序库。它最初是WSGI实用程序各种工具的简单集合,现已成为最高级的WSGI实用程序库之一,是Flask背后的项目。Werkzeug 是一个德语单词,工具的意思。这个单词发音对我来说,有点困难(可能也是它知名度不高的重要因素之一),刚好官方logo是个锤子,我就简称“德国锤子”。文章已经完成上下两篇,上篇介绍:
- serving && wsgi
- request && response
- local的
下篇介绍:
- middleware
- routing && urls
- datastructures
“德国锤子” 还有3个比较重要的功能,不要放过,我们继续学习:
- reloader
- debug
- 配合SQLAlchemy操作数据库
reloader
reloader演示
reloader是调试程序时非常实用的功能,开发的时候不用手动重启服务,修改代码后会自动重启服务,提高研发效率。运行示例中的Shorty服务:
1
2
3
4
5
|
# python3 shortly.py
 * Running on http://127.0.0.1:5000/ (Press CTRL+C to quit)
 * Restarting with stat
 * Debugger is active!
 * Debugger PIN: 722-230-382
|
程序启动后实际上有2个进程, 10527 的主进程和 10529 的子进程:
1
2
|
501 10527  7144   0  8:36上午 ttys008    0:00.23 .../Python.app/Contents/MacOS/Python shortly.py
501 10529 10527   0  8:36上午 ttys008    0:00.34 .../Python.app/Contents/MacOS/Python /Users/yoo/work/yuanmahui/python/ch20-werkzeug/shortly.py
|
随便修改一下 shortly.py 代码,比如增加一个日志输出。可以发现启动日志有下面reload的信息:
1
2
3
4
|
...
 * Detected change in '/Users/yoo/work/yuanmahui/python/ch20-werkzeug/shortly.py', reloading
 * Restarting with stat
 ...
|
再观查进程信息可以发现 10529 子进程已经退出,新增了 10634 子进程:
1
2
|
501 10527  7144   0  8:36上午 ttys008    0:00.24 .../Python.app/Contents/MacOS/Python shortly.py
501 10634 10527   0  8:38上午 ttys008    0:00.77 .../Python.app/Contents/MacOS/Python /Users/yoo/work/yuanmahui/python/ch20-werkzeug/shortly.py
|
可以推测,主/子进程检测代码变动,然后子进程关闭/退出,再由主进程重新创建一个子进程。那么到底子进程是自动退出还是被主进程关闭?是主进程监听代码变化还是子进程监听的呢?我们带着这2个问题,一起看看代码实现。
reloader的实现原理
启动服务的时候,需要使用 use_reloader=True 参数启动reloader
1
|
run_simple("127.0.0.1", 5000, app, use_debugger=True, use_reloader=True)
|
服务启动时候判断是独立启动,还是由reload启动:
 1
 2
 3
 4
 5
 6
 7
 8
 9
10
11
12
13
14
|
# serving.py
def run_simple(...):
    if not is_running_from_reloader():
        ...

    from ._reloader import run_with_reloader as _rwr

    _rwr(
        inner,
        extra_files=extra_files,
        exclude_patterns=exclude_patterns,
        interval=reloader_interval,
        reloader_type=reloader_type,
    )
|
主进程和子进程的判断是通过 WERKZEUG_RUN_MAIN 的环境变量进行判断,默认情况下是没有这个环境变量:
1
2
|
def is_running_from_reloader() -> bool:
    return os.environ.get("WERKZEUG_RUN_MAIN") == "true"
|
使用reloader启动的代码如下:
 1
 2
 3
 4
 5
 6
 7
 8
 9
10
11
12
13
14
15
16
17
18
19
20
21
22
23
24
25
26
27
28
29
30
31
32
|
# _reloader.py

def run_with_reloader(
    main_func: t.Callable[[], None],
    extra_files: t.Optional[t.Iterable[str]] = None,
    exclude_patterns: t.Optional[t.Iterable[str]] = None,
    interval: t.Union[int, float] = 1,
    reloader_type: str = "auto",
) -> None:
    """Run the given function in an independent Python interpreter."""
    import signal

    signal.signal(signal.SIGTERM, lambda *args: sys.exit(0))
    reloader = reloader_loops[reloader_type](
        extra_files=extra_files, exclude_patterns=exclude_patterns, interval=interval
    )

    try:
        if os.environ.get("WERKZEUG_RUN_MAIN") == "true":
            ensure_echo_on()
            t = threading.Thread(target=main_func, args=())
            t.daemon = True

            # Enter the reloader to set up initial state, then start
            # the app thread and reloader update loop.
            with reloader:
                t.start()
                reloader.run()
        else:
            sys.exit(reloader.restart_with_reloader())
    except KeyboardInterrupt:
        pass
|
代码主要功能:
- 注册系统信号处理,支持使用 CTRL+C 退出
- 选择reloader的实现,默认是
stat 的实现,还有一种是 watchdog 的实现。后者需要额外安装,但是效率会高一些
- 判断是否主进程,主进程则只是启动reloader ; 子进程则使用守护线程方式启动服务程序
关于stat和watchdog的区别,请看下面的官方文档:
默认stat后端只是mtime定期检查所有文件的 。这对于大多数情况来说已经足够了,但是众所周知,它会耗尽笔记本电脑的电池。
在watchdog后端使用文件系统事件,而且比stat快, 但是它需要 安装看门狗模块。实现此目的的推荐方法是添加 Werkzeug[watchdog]到您的需求文件中。
ReloaderLoop是reloader实现的基类:
 1
 2
 3
 4
 5
 6
 7
 8
 9
10
11
12
13
14
15
16
17
18
19
20
21
22
23
24
25
26
27
28
29
30
31
32
33
34
35
36
37
38
39
40
41
42
43
44
45
46
47
48
49
50
51
52
53
54
55
56
57
58
59
60
|
class ReloaderLoop:
    name = ""

    def __init__(
        self,
        extra_files: t.Optional[t.Iterable[str]] = None,
        exclude_patterns: t.Optional[t.Iterable[str]] = None,
        # 默认1s的间隔
        interval: t.Union[int, float] = 1,
    ) -> None:
        self.extra_files: t.Set[str] = {os.path.abspath(x) for x in extra_files or ()}
        self.exclude_patterns: t.Set[str] = set(exclude_patterns or ())
        self.interval = interval

    def __enter__(self) -> "ReloaderLoop":
        """Do any setup, then run one step of the watch to populate the
        initial filesystem state.
        """
        self.run_step()
        return self

    def __exit__(self, exc_type, exc_val, exc_tb):  # type: ignore
        """Clean up any resources associated with the reloader."""
        pass

    def run(self) -> None:
        """Continually run the watch step, sleeping for the configured
        interval after each step.
        """
        while True:
            self.run_step()
            time.sleep(self.interval)

    def run_step(self) -> None:
        """Run one step for watching the filesystem. Called once to set
        up initial state, then repeatedly to update it.
        """
        pass

    def restart_with_reloader(self) -> int:
        """Spawn a new Python interpreter with the same arguments as the
        current one, but running the reloader thread.
        """
        while True:
            _log("info", f" * Restarting with {self.name}")
            args = _get_args_for_reloading()
            new_environ = os.environ.copy()
            new_environ["WERKZEUG_RUN_MAIN"] = "true"
            exit_code = subprocess.call(args, env=new_environ, close_fds=False)

            if exit_code != 3:
                return exit_code

    def trigger_reload(self, filename: str) -> None:
        self.log_reload(filename)
        sys.exit(3)

    def log_reload(self, filename: str) -> None:
        filename = os.path.abspath(filename)
        _log("info", f" * Detected change in {filename!r}, reloading")
|
- ReloaderLoop是一个上下文装饰器,进入的时候自动调用子类的run_step方法。
- 在主进程中使用restart_with_reloader函数进行工作。这是一个无限循环,循环中使用
subprocess.call 创建一个子进程,并监听子进程的退出状态。如果退出状态为3则可以无限循环;如果不为3则会退出循环,结束主进程。
- 创建子进程时候,设置关键的 WERKZEUG_RUN_MAIN 环境变量标识。
- 子进程使用run方法持续监听代码变化。
- 如果触发reload则当前子进程退出。
StatReloaderLoop的实现比较简单,代码如下:
 1
 2
 3
 4
 5
 6
 7
 8
 9
10
11
12
13
14
15
16
17
18
19
20
21
22
|
class StatReloaderLoop(ReloaderLoop):
    name = "stat"

    def __enter__(self) -> ReloaderLoop:
        self.mtimes: t.Dict[str, float] = {}
        return super().__enter__()

    def run_step(self) -> None:
        for name in chain(_find_stat_paths(self.extra_files, self.exclude_patterns)):
            try:
                mtime = os.stat(name).st_mtime
            except OSError:
                continue

            old_time = self.mtimes.get(name)

            if old_time is None:
                self.mtimes[name] = mtime
                continue

            if mtime > old_time:
                self.trigger_reload(name)
|
- run_step中记录每个代码的时间戳,如果发现有文件的时间戳变化,则调用父类的trigger_reload
所以主进程只是负责持续创建子进程,子进程自己检测代码变化和自动退出。
debug
debug的展示
在Shortly中增加一个echo的view:
1
2
3
4
|
Rule("/echo", endpoint="echo"),

def on_echo(self, request):
    raise
|
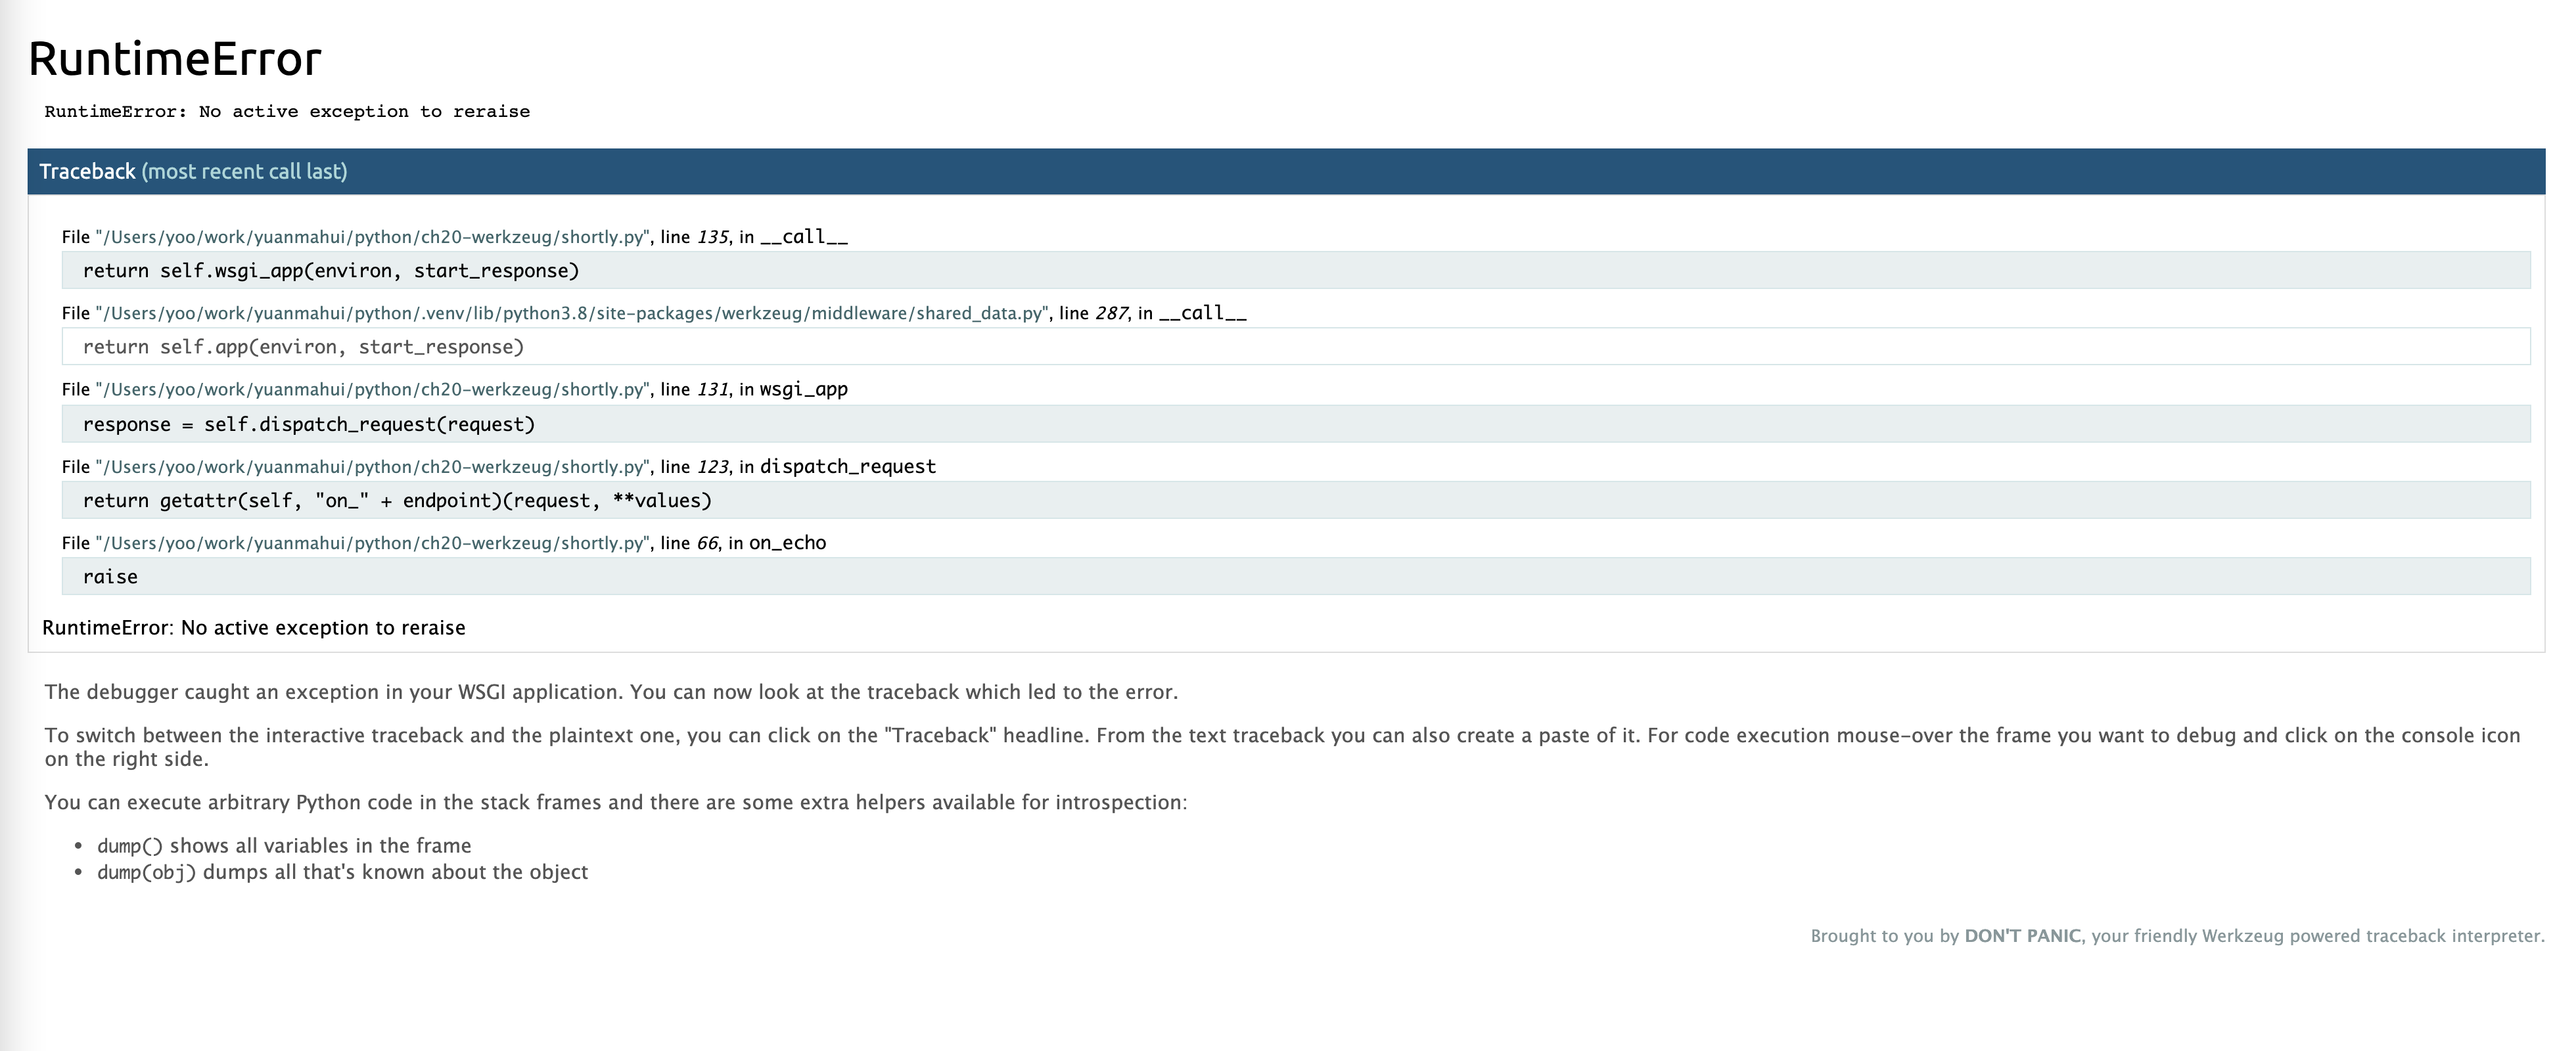
访问这个view可以看到下面的异常信息, 带有完整的业务堆栈:

点击右侧的console图标,会提示输入PIN:

在console中可以进行调试:

2.0.1 版本的dubug可能有bug,需要使用 os.environ["WERKZEUG_DEBUG_PIN"] = "off" 关闭pin-auth的认证,才能够正常工作
debug的实现原理
python3自带REPL的模块 code, 看起来和python的命令行差不多,仔细对比会发现多了 (InteractiveConsole) 的输出。自己的应用程序中嵌入code,就可以实现交互式的debug功能。
 1
 2
 3
 4
 5
 6
 7
 8
 9
10
11
|
# python3 -m code
Python 3.8.5 (v3.8.5:580fbb018f, Jul 20 2020, 12:11:27)
[Clang 6.0 (clang-600.0.57)] on darwin
Type "help", "copyright", "credits" or "license" for more information.
(InteractiveConsole) # <- 提示信息
>>>
# python3
Python 3.8.5 (v3.8.5:580fbb018f, Jul 20 2020, 12:11:27)
[Clang 6.0 (clang-600.0.57)] on darwin
Type "help", "copyright", "credits" or "license" for more information.
>>>
|
启动服务的入口,如果有debug参数则使用DebuggedApplication来包裹业务app:
1
2
3
4
5
|
# serving.py
def run_simple(...):
    if use_debugger:
        from .debug import DebuggedApplication
        application = DebuggedApplication(application, use_evalex)
|
DebuggedApplication主要的call函数:
 1
 2
 3
 4
 5
 6
 7
 8
 9
10
11
12
13
14
15
16
17
18
19
20
21
22
23
24
25
26
27
28
29
30
31
32
33
34
|
# debug
def __call__(
    self, environ: "WSGIEnvironment", start_response: "StartResponse"
) -> t.Iterable[bytes]:
    """Dispatch the requests."""
    request = Request(environ)
    response = self.debug_application
    if request.args.get("__debugger__") == "yes":
        # 处理debug请求
        cmd = request.args.get("cmd")
        arg = request.args.get("f")
        secret = request.args.get("s")
        frame = self.frames.get(request.args.get("frm", type=int))
        if cmd == "resource" and arg:
            response = self.get_resource(request, arg)  # type: ignore
        elif cmd == "pinauth" and secret == self.secret:
            response = self.pin_auth(request)  # type: ignore
        elif cmd == "printpin" and secret == self.secret:
            response = self.log_pin_request()  # type: ignore
        elif (
            self.evalex
            and cmd is not None
            and frame is not None
            and self.secret == secret
            and self.check_pin_trust(environ)
        ):
            response = self.execute_command(request, cmd, frame)  # type: ignore
    elif (
        self.evalex
        and self.console_path is not None
        and request.path == self.console_path
    ):
        response = self.display_console(request)  # type: ignore
    return response(environ, start_response)
|
- call接收wsgi的输入environ和start_response
- response使用debug_application处理
- 如果request上有__debugger__信息,则进行debug处理,比如显示异常堆栈,显示PIN认证以及调试指令等等
debug的重点在debug_application函数:
 1
 2
 3
 4
 5
 6
 7
 8
 9
10
11
12
13
14
15
16
17
18
19
20
21
22
23
24
25
26
27
28
29
30
31
32
33
34
35
36
37
38
39
40
41
42
43
44
45
|
def debug_application(
    self, environ: "WSGIEnvironment", start_response: "StartResponse"
) -> t.Iterator[bytes]:
    """Run the application and conserve the traceback frames."""
    app_iter = None
    try:
        # 正常业务
        app_iter = self.app(environ, start_response)
        yield from app_iter
        if hasattr(app_iter, "close"):
            app_iter.close()  # type: ignore
    except Exception:
        # 异常调试
        if hasattr(app_iter, "close"):
            app_iter.close()  # type: ignore
        traceback = get_current_traceback(
            skip=1,
            show_hidden_frames=self.show_hidden_frames,
            ignore_system_exceptions=True,
        )
        for frame in traceback.frames:
            self.frames[frame.id] = frame
        self.tracebacks[traceback.id] = traceback

        try:
            start_response(
                "500 INTERNAL SERVER ERROR",
                [
                    ("Content-Type", "text/html; charset=utf-8"),
                    ("X-XSS-Protection", "0"),
                ],
            )
        except Exception:
            environ["wsgi.errors"].write(
                "Debugging middleware caught exception in streamed "
                "response at a point where response headers were already "
                "sent.\n"
            )
        else:
            is_trusted = bool(self.check_pin_trust(environ))
            yield traceback.render_full(
                evalex=self.evalex, evalex_trusted=is_trusted, secret=self.secret
            ).encode("utf-8", "replace")

        traceback.log(environ["wsgi.errors"])
|
- 使用
app_iter = self.app(environ, start_response) 执行业务功能
- 使用try-except捕获业务异常,对异常信息进行获取traceback
- 返回500的http状态,并且使用traceback.render_full渲染html显示异常堆栈
pin
debug可以使用web界面调试程序,这会产生安全问题。所以werkzeug的debug中引入了PIN机制,需要输入PIN验证码才可以进行调试,PIN在服务端的命令行中输出。
前端页面输入PIN后会提交PIN码:
 1
 2
 3
 4
 5
 6
 7
 8
 9
10
11
12
13
14
15
16
17
18
19
20
21
22
23
24
25
|
# debugger.js

function initPinBox() {
  document.querySelector(".pin-prompt form").addEventListener(
    "submit",
    function (event) {
      ....

      fetch(
        `${document.location.pathname}?__debugger__=yes&cmd=pinauth&pin=${pin}&s=${encodedSecret}`
      )
        .then((res) => res.json())
        .then(({auth, exhausted}) => {
          if (auth) {
            EVALEX_TRUSTED = true;
            fadeOut(document.getElementsByClassName("pin-prompt")[0]);
          } else {
            ....
          }
        })
        ...
    },
    false
  );
}
|
这段JS代码重点是 __debugger__=yes&cmd=pinauth&pin=${pin}&s=${encodedSecret} 的URL,这个请求会直接被DebuggedApplication处理:
 1
 2
 3
 4
 5
 6
 7
 8
 9
10
11
12
13
14
15
16
17
|
    if request.args.get("__debugger__") == "yes":
        cmd = request.args.get("cmd")
        arg = request.args.get("f")
        secret = request.args.get("s")
        frame = self.frames.get(request.args.get("frm", type=int))  # type: ignore
        ...
        elif cmd == "pinauth" and secret == self.secret:
            response = self.pin_auth(request)  # type: ignore
        ...
        elif (
            self.evalex
            and cmd is not None
            and frame is not None
            and self.secret == secret
            and self.check_pin_trust(environ)
        ):
            response = self.execute_command(request, cmd, frame)  # type: ignore
|
- 如果cmd=pinauth则进行pin的验证
- 如果cmd是其它,比如dump或者对象之类,则执行对应的command, 调试信息的时候会使用
auth认证函数:
 1
 2
 3
 4
 5
 6
 7
 8
 9
10
11
12
13
14
15
16
17
18
19
20
21
22
23
24
25
26
27
28
29
30
31
|
def pin_auth(self, request: Request) -> Response:
    """Authenticates with the pin."""
    exhausted = False
    auth = False
    trust = self.check_pin_trust(request.environ)
    ...
    # Otherwise go through pin based authentication
    else:
        entered_pin = request.args["pin"]
        # 对比PIN
        if entered_pin.strip().replace("-", "") == pin.replace("-", ""):
            self._failed_pin_auth = 0
            auth = True
        else:
            self._fail_pin_auth()

    rv = Response(
        json.dumps({"auth": auth, "exhausted": exhausted}),
        mimetype="application/json",
    )
    if auth:
        # 设置cookie
        rv.set_cookie(
            self.pin_cookie_name,
            f"{int(time.time())}|{hash_pin(pin)}",
            httponly=True,
            samesite="None",
        )
    elif bad_cookie:
        rv.delete_cookie(self.pin_cookie_name)
    return rv
|
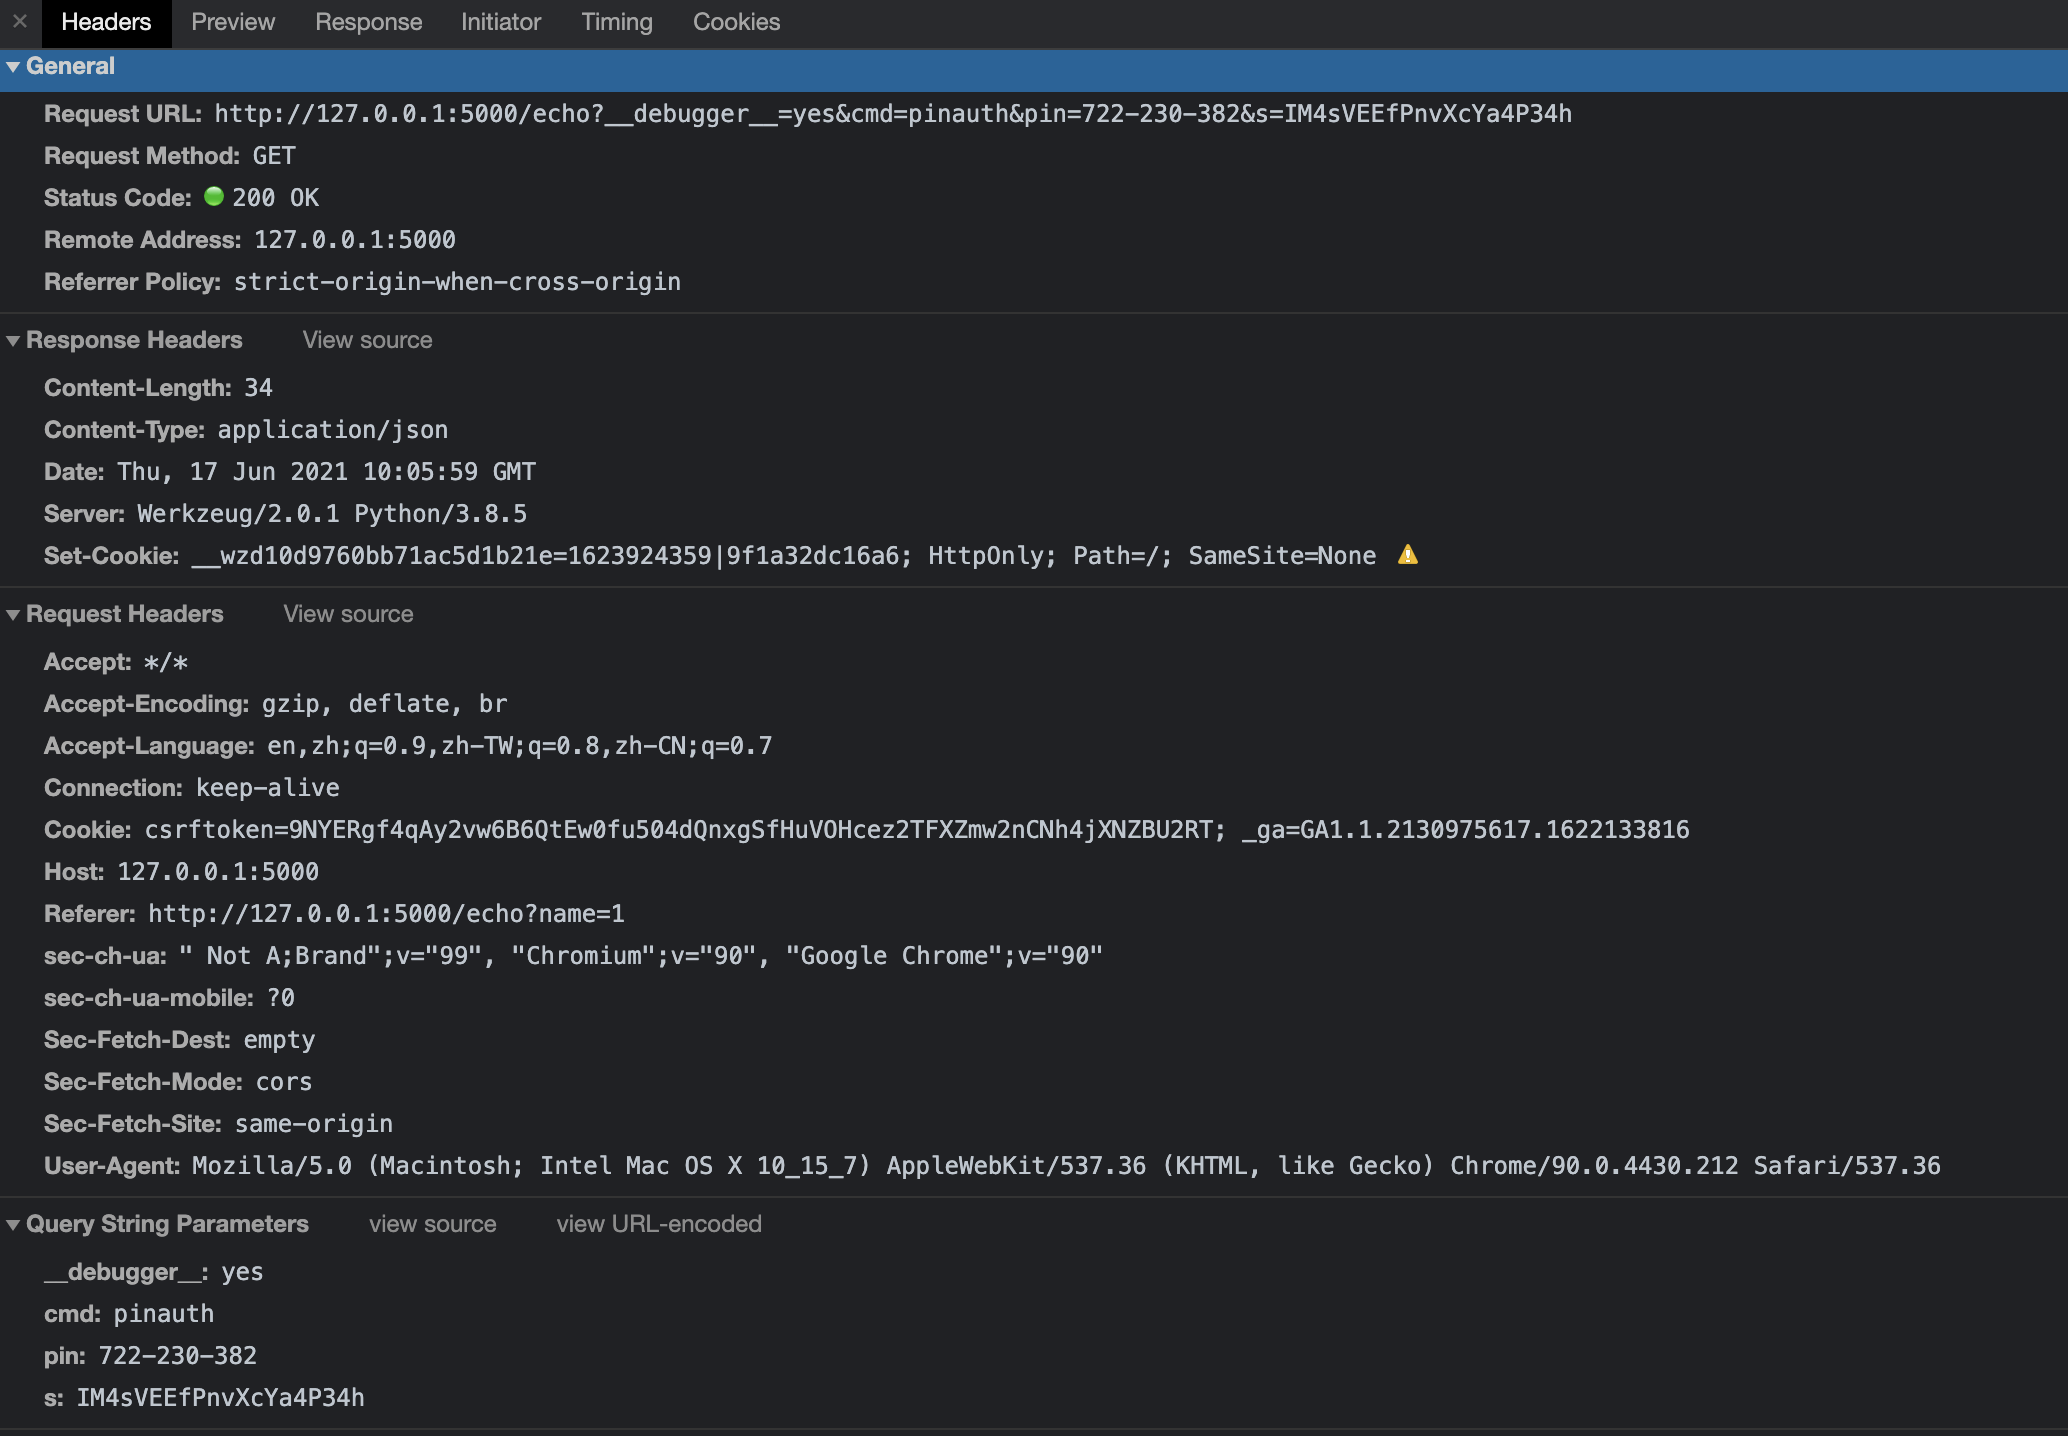
查看http请求详情,会发现认证成功后会设置一个Response-Cookie:__wzd10d9760bb71ac5d1b21e ,这样后续的debug调试都使用这个cookie。

开启PIN验证后,无法调试就是因为这个cookie在调试的时候没有附带上
Interactive
debug调试主要使用_InteractiveConsole的runsource实现:
 1
 2
 3
 4
 5
 6
 7
 8
 9
10
11
12
13
14
15
16
17
18
19
|
class _InteractiveConsole(code.InteractiveInterpreter):
    locals: t.Dict[str, t.Any]
    ...
    def runsource(self, source: str, **kwargs: t.Any) -> str:  # type: ignore
        source = f"{source.rstrip()}\n"
        ThreadedStream.push()
        prompt = "... " if self.more else ">>> "
        try:
            source_to_eval = "".join(self.buffer + [source])
            if super().runsource(source_to_eval, "<debugger>", "single"):
                self.more = True
                self.buffer.append(source)
            else:
                self.more = False
                del self.buffer[:]
        finally:
            output = ThreadedStream.fetch()
        return prompt + escape(source) + output
   ...
|
runsource函数比较复杂,但是核心就是对前端网页提交的字符串信息进行编译执行,并把执行的输出捕获后反馈给前端,和之前的介绍CGI实现类似。
开发的时候,可以利用debug功能协助进行调试,提高研发效率。需要注意的是,debug功能不可以用于线上环境。
配合SQLAlchemy操作数据库
数据库操作是Web程序非常重要的一环,werkzeug中操作数据可以使用sqlalchemy。
SQLAlchemy回顾
在正式介绍Werkzeug配合SQLAlchemy操作数据库操作数据库之前,我们先简单回顾一下SQLAlchemy的ORM使用:
 1
 2
 3
 4
 5
 6
 7
 8
 9
10
11
12
13
14
15
16
17
18
19
20
21
22
23
24
25
26
27
28
29
30
31
|
from sqlalchemy import create_engine
from sqlalchemy.ext.declarative import declarative_base
from sqlalchemy import Column, Integer, String
from sqlalchemy.orm import sessionmaker

engine = create_engine('sqlite:///:memory:', echo=True)
Model = declarative_base()

class User(Model):
    __tablename__ = 'users'

    id = Column(Integer, primary_key=True)
    name = Column(String)
    fullname = Column(String)
    nickname = Column(String)

    def __repr__(self):
        return "<User(name='%s', fullname='%s', nickname='%s')>" % (
            self.name, self.fullname, self.nickname)

Model.metadata.create_all(engine)
print("=" * 10)
Session = sessionmaker(bind=engine)
session = Session()
ed_user = User(name='ed', fullname='Ed Jones', nickname='edsnickname')
session.add(ed_user)
session.commit()
print(ed_user.id)
result = engine.execute("select * from users")
for row in result:
    print(row)
|
- 创建engine,用于数据库连接
- 创建Model
- 创建User模型
- 将metadata提交到engine(创建表)
- 创建session
- 使用users插入数据:创建对象,add到session,然后提交session
- …
SQLAlchemy配合使用
示例shorty中演示了如何使用SQLAlchemy操作SQLite数据库。使用方法是先使用 initdb 初始化sqlite数据库,然后再使用 runserver 启动服务:
1
2
|
python3 manage-shorty.py initdb
python3 manage-shorty.py runserver
|
先看看View中如何通过ORM操作数据,这是插入数据:
1
2
|
uid = URL(url, "private" not in request.form, alias).uid
session.commit()
|
这是查询数据:
1
|
url = URL.query.get(uid)
|
- 创建数据后使用session.commit后就提交
- 查询数据使用模型的query
URL的数据模型是这样定义的:
 1
 2
 3
 4
 5
 6
 7
 8
 9
10
11
12
13
14
15
16
17
18
19
20
21
22
23
24
25
26
27
28
29
30
31
32
|
url_table = Table(
    "urls",
    metadata,
    Column("uid", String(140), primary_key=True),
    Column("target", String(500)),
    Column("added", DateTime),
    Column("public", Boolean),
)

class URL:
    query = session.query_property()

    def __init__(self, target, public=True, uid=None, added=None):
        self.target = target
        self.public = public
        self.added = added or datetime.utcnow()
        if not uid:
            while 1:
                uid = get_random_uid()
                if not URL.query.get(uid):
                    break
        self.uid = uid
        session.add(self)

    @property
    def short_url(self):
        return url_for("link", uid=self.uid, _external=True)

    def __repr__(self):
        return f"<URL {self.uid!r}>"

mapper(URL, url_table)
|
- 注意URL模型的init方法,创建对象时候自动生成uid,并且添加到session,然后view使用commit就提交数据。这种使用方式和回顾里一致。
- URL中定义了一个query,可以用来检索数据,这和django中Model的object类似。
database_engine在创建创建App时候创建:
 1
 2
 3
 4
 5
 6
 7
 8
 9
10
|
class Shorty:
    def __init__(self, db_uri):
        local.application = self
        self.database_engine = create_engine(db_uri, convert_unicode=True)

        self.dispatch = SharedDataMiddleware(self.dispatch, {"/static": STATIC_PATH})

    def init_database(self):
        # 等同 Model.metadata.create_all(engine)
        metadata.create_all(self.database_engine)
|
最关键的地方是session:
 1
 2
 3
 4
 5
 6
 7
 8
 9
10
|
local = Local()
local_manager = LocalManager([local])
# local.application = self
application = local("application")
...
session = scoped_session(
    lambda: create_session(
        application.database_engine, autocommit=False, autoflush=False
    )
)
|
简单的说这里scoped_session是绑定到线程的,跟随请求的生命周期。这样在请求中可以使用session访问数据。
小结
本章我们学习了web框架如何使用reload和debug协助研发,提高研发效率。reload主要是使用了subprocess开启多个python进程,debug则是使用code的REPL功能。
werkzeug也提供了使用sqlalchemy操作数据库的示例Shorty,使用ORM功能可以快速编写适配多种数据存储引擎的程序。
原创不易,欢迎加下面的微信和我互动交流,一起进阶:

参考链接


