SQLAlchemy是Python SQL工具箱和ORM框架,它为应用程序开发人员提供了全面而灵活的SQL功能。它提供了一整套企业级持久化方案,旨在高效,高性能地访问数据库,并符合简单的Pythonic哲学。项目代码量比较大,接近200个文件,7万行代码, 我们一起来挑战一下。由于篇幅原因,分成上下两篇,上篇包括如下内容:
- SQLAlchemy项目结构
- 使用SQLAlchemy操作sqlite数据库
- Engine代码分析
- SQLiteDialect代码分析
- Connection&&Pool代码分析
- execute-SQL语句
- Result分析
- 小结
- 小技巧
SQLAlchemy项目结构
源码使用的版本是 1.3.0, 对应的commitID是 740bb50c2,和参考链接中官方文档1.3版本一致。项目目录大概包括:
| 目录 |
描述 |
| connectors |
连接 |
| dialects |
方言 |
| engine |
引擎 |
| event |
事件 |
| ext |
扩展功能 |
| orm |
orm |
| pool |
连接池 |
| sql |
sql处理 |
| util |
工具类 |
SQLAlchemy的架构图如下:
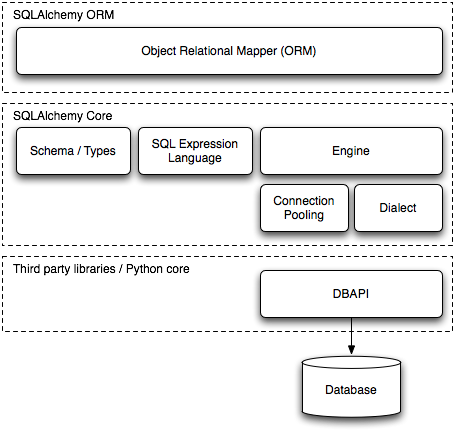
整体分成3层,从上到下分别是ORM,core和DBAPI,其中core,又分成左右两个区域。我们先学习其中的引擎,连接池,dialects(仅sqlite)和DBAPI部分,也就是架构图的右半侧。其中DBAPI(sqlite相关)是在python-core-library中提供。
用SQLAlchemy操作sqlite数据库
先从使用DBAPI操作sqlite的API开始:
 1
 2
 3
 4
 5
 6
 7
 8
 9
10
11
12
13
14
15
16
17
18
19
20
21
22
23
|
import sqlite3
con = sqlite3.connect('example.db')
cur = con.cursor()

# Create table
cur.execute('''CREATE TABLE stocks
               (date text, trans text, symbol text, qty real, price real)''')

# Insert a row of data
cur.execute("INSERT INTO stocks VALUES ('2006-01-05','BUY','RHAT',100,35.14)")

# Save (commit) the changes
con.commit()

# Do this instead
t = ('RHAT',)
cur.execute('SELECT * FROM stocks WHERE symbol=?', t)
print(cur.fetchone())


# We can also close the connection if we are done with it.
# Just be sure any chang
con.close()
|
操作sqlite数据库主要包括了下面几个步骤:
- connect数据库获得连接con
- 从连接中获取操作游标cur
- 使用cur执行sql语句(statement)
- 向连接con提交commit事务
- 使用cur的fetchone/fecthmany/fetchall方法获取数据
- 完成数据获取后使用close方法关闭连接con
对比一下使用sqlalchemy进行sqlite操作:
 1
 2
 3
 4
 5
 6
 7
 8
 9
10
11
12
13
14
|
from sqlalchemy import create_engine
eng = create_engine("sqlite:///:memory:", echo=True)
conn = eng.connect()
conn.execute("create table x (a integer, b integer)")
conn.execute("insert into x (a, b) values (1, 1)")
conn.execute("insert into x (a, b) values (2, 2)")
result = conn.execute("select x.a, x.b from x")
assert result.keys() == ["a", "b"]
result = conn.execute('''
    select x.a, x.b from x where a=1
    union
    select x.a, x.b from x where a=2
''')
assert result.keys() == ["a", "b"]
|
可以看到使用sqlalchemy后操作变的简单,把cursor,commit,fetch和close等操作隐藏到engine内部,简化成3步:
- 使用create_engine函数创建引擎eng
- 使用引擎的connect方法创建连接conn
- 使用conn执行SQL语句并获取返回的执行结果
Engine代码分析
跟随create_engine的API,可以看到这里使用策略模式去创建不同的engine实现:
 1
 2
 3
 4
 5
 6
 7
 8
 9
10
|
# engine/__init__.py

from . import strategies

default_strategy = "plain"  # 默认

def create_engine(*args, **kwargs):
    strategy = kwargs.pop("strategy", default_strategy)
    strategy = strategies.strategies[strategy]
    return strategy.create(*args, **kwargs)
|
默认的engine策略:
 1
 2
 3
 4
 5
 6
 7
 8
 9
10
11
12
13
14
15
16
17
18
19
20
|
# engine/strategies.py

strategies = {}

class EngineStrategy(object):

    def __init__(self):
        strategies[self.name] = self

class DefaultEngineStrategy(EngineStrategy):

    def create(self, name_or_url, **kwargs):
        ...

class PlainEngineStrategy(DefaultEngineStrategy):
    name = "plain"
    engine_cls = base.Engine  # 引擎类


PlainEngineStrategy()
|
重点就在策略的create方法了, 去掉数据准备和异常处理后核心代码如下:
 1
 2
 3
 4
 5
 6
 7
 8
 9
10
11
12
13
14
15
16
17
18
19
|
def create(self, name_or_url, **kwargs):
    ...
    # get dialect class
    u = url.make_url(name_or_url)
    entrypoint = u._get_entrypoint()
    dialect_cls = entrypoint.get_dialect_cls(u)

    # create dialect
    dialect = dialect_cls(**dialect_args)

    # pool
    poolclass = dialect_cls.get_pool_class(u)
    pool = poolclass(creator, **pool_args)

    # engine
    engineclass = self.engine_cls
    engine = engineclass(pool, dialect, u, **engine_args)
    ...
    return engine
|
create函数可以理解为engine的创建模版,主要是下面3个步骤:
- 根据url获取到数据库方言,适配不同数据库sqlite/mysql/postgresql…
- 获取不同方言的连接池实现
- 创建engine,持有dialect和pool
Engine的构造函数和connect方法如下:
 1
 2
 3
 4
 5
 6
 7
 8
 9
10
11
12
13
14
15
16
17
18
19
20
21
|
class Engine(Connectable, log.Identified):
    _connection_cls = Connection

    def __init__(
        self,
        pool,
        dialect,
        url,
        logging_name=None,
        echo=None,
        proxy=None,
        execution_options=None,
    ):
        self.pool = pool
        self.url = url
        self.dialect = dialect
        self.engine = self
        ...

    def connect(self, **kwargs):
        return self._connection_cls(self, **kwargs)
|
engine主要功能就是管理和持有connection,pool和dialect,对外提供API。
SQLiteDialect代码分析
dialect是根据url自动识别,使用PluginLoader进行动态加载:
 1
 2
 3
 4
 5
 6
 7
 8
 9
10
11
12
13
14
15
16
17
|
class PluginLoader(object):
    def __init__(self, group, auto_fn=None):
        self.group = group
        self.impls = {}
        self.auto_fn = auto_fn

    def load(self, name):
        # import一次
        if name in self.impls:
            return self.impls[name]()

        if self.auto_fn:
            loader = self.auto_fn(name)
            if loader:
                self.impls[name] = loader
                return loader()
        ...
|
sqlite-dialect使用下面的 __import__ 动态加载模块:
 1
 2
 3
 4
 5
 6
 7
 8
 9
10
11
12
13
14
15
16
17
18
19
20
21
22
23
24
|
def _auto_fn(name):
    if "." in name:
        dialect, driver = name.split(".")
    else:
        dialect = name
        driver = "base"

    if dialect in _translates:
        translated = _translates[dialect]
        dialect = translated
    try:
        # 动态加载模块
        module = __import__("sqlalchemy.dialects.%s" % (dialect,)).dialects
    except ImportError:
        return None

    module = getattr(module, dialect)
    if hasattr(module, driver):
        module = getattr(module, driver)
        return lambda: module.dialect
    else:
        return None

registry = util.PluginLoader("sqlalchemy.dialects", auto_fn=_auto_fn)
|
不同方言实现需要提供一个dialect对象,在sqlite中是这样的:
 1
 2
 3
 4
 5
 6
 7
 8
 9
10
11
|
## sqlalchemy/dialects/sqlite/__init__.py

base.dialect = dialect = pysqlite.dialect


## sqlalchemy/dialects/sqlite/pysqlite.py

class SQLiteDialect_pysqlite(SQLiteDialect):
    pass

dialect = SQLiteDialect_pysqlite
|
SQLiteDialect功能相简单,一是决定POOL_CLASS的类型: memory实现使用的是SingletonThreadPool;db文件使用NullPool,下面分析Pool时候会用到。
1
2
3
4
5
6
7
8
|
class SQLiteDialect_pysqlite(SQLiteDialect):

    @classmethod
    def get_pool_class(cls, url):
        if url.database and url.database != ":memory:":
            return pool.NullPool
        else:
            return pool.SingletonThreadPool
|
二是提供包装DBAPI得到的connect:
 1
 2
 3
 4
 5
 6
 7
 8
 9
10
11
12
13
14
15
16
17
18
19
20
21
22
23
24
25
26
27
28
29
30
31
32
|
class DefaultDialect(interfaces.Dialect):
    ...
    def connect(self, *cargs, **cparams):
        return self.dbapi.connect(*cargs, **cparams)

class SQLiteDialect_pysqlite(SQLiteDialect):
    ...
    @classmethod
    def dbapi(cls):
        try:
            from pysqlite2 import dbapi2 as sqlite
        except ImportError:
            try:
                from sqlite3 import dbapi2 as sqlite  # try 2.5+ stdlib name.
            except ImportError as e:
                raise e
        return sqlite

    def connect(self, *cargs, **cparams):
        passphrase = cparams.pop("passphrase", "")

        pragmas = dict((key, cparams.pop(key, None)) for key in self.pragmas)

        conn = super(SQLiteDialect_pysqlcipher, self).connect(
            *cargs, **cparams
        )
        conn.execute('pragma key="%s"' % passphrase)
        for prag, value in pragmas.items():
            if value is not None:
                conn.execute('pragma %s="%s"' % (prag, value))

        return conn
|
connect在SQLiteDialect_pysqlite类和父类DefaultDialect之间反复横跳,核心功能就是下面2句代码:
1
2
|
from sqlite3 import dbapi2 as sqlite
sqlite.connect(*cargs, **cparams)
|
Connect和Pool代码分析
Connection构造函数如下:
 1
 2
 3
 4
 5
 6
 7
 8
 9
10
11
12
13
14
15
16
|
class Connection(Connectable):

    def __init__(
        self,
        engine,
        connection=None,
        close_with_result=False,
        _branch_from=None,
        _execution_options=None,
        _dispatch=None,
        _has_events=None,
    ):
        self.engine = engine
        self.dialect = engine.dialect
        self.__connection =  engine.raw_connection()
        ...
|
connection主要使用engine.raw_connection创建了一个DBAPI连接
 1
 2
 3
 4
 5
 6
 7
 8
 9
10
11
12
13
14
|
class Engine(Connectable, log.Identified):

    def raw_connection(self, _connection=None):
        return self._wrap_pool_connect(
            self.pool.unique_connection, _connection
        )


    def _wrap_pool_connect(self, fn, connection):
        dialect = self.dialect
        try:
            return fn()
        except dialect.dbapi.Error as e:
            ...
|
pool.unique_connection负责创建数据库连接,这里的实现过程比较复杂,个人觉得也挺绕的,涉及Pool,ConnectionFairy和ConnectionRecord三个类。我们一点一点的跟踪:
 1
 2
 3
 4
 5
 6
 7
 8
 9
10
11
12
13
14
15
16
17
18
|
class SingletonThreadPool(Pool):

    def __init__(self, creator, pool_size=5, **kw):
        Pool.__init__(self, creator, **kw)
        self._conn = threading.local()
        self._all_conns = set()
        self.size = pool_size

    def unique_connection(self):
        return _ConnectionFairy._checkout(self)

    def _do_get(self):
        c = _ConnectionRecord(self)
        self._conn.current = weakref.ref(c)
        if len(self._all_conns) >= self.size:
            self._cleanup()
        self._all_conns.add(c)
        return c
|
SingletonThreadPool主要在_do_get的实现,创建一个ConnectionRecor对象,然后将其加入到自己管理的集合中后再返回,标准的池操作了。
如何通过unique_connection方法去触发_do_get方法并得到实际的db-connect
 1
 2
 3
 4
 5
 6
 7
 8
 9
10
11
12
13
14
15
16
17
18
19
20
21
22
23
24
25
26
27
28
29
30
31
32
33
34
35
36
37
38
39
40
41
42
43
44
45
46
47
48
49
50
51
52
53
54
|
class _ConnectionFairy(object):

    def __init__(self, dbapi_connection, connection_record, echo):
        self.connection = dbapi_connection
        self._connection_record = connection_record

    @classmethod
    def _checkout(cls, pool, threadconns=None, fairy=None):
        if not fairy:
            fairy = _ConnectionRecord.checkout(pool)

            fairy._pool = pool
            fairy._counter = 0
        return fairy
...

class _ConnectionRecord(object):

    def __init__(self, pool, connect=True):
        self.__pool = pool

    @classmethod
    def checkout(cls, pool):
        rec = pool._do_get()
        try:
            dbapi_connection = rec.get_connection()
        except Exception as err:
            ...

        fairy = _ConnectionFairy(dbapi_connection, rec, echo)
        rec.fairy_ref = weakref.ref(
            fairy,
            lambda ref: _finalize_fairy
            and _finalize_fairy(None, rec, pool, ref, echo),
        )
        ...
        return fairy

    def get_connection(self):
        pool = self.__pool
        connection = pool.creator(self)
        self.connection = connection
        return connection

...
class DefaultEngineStrategy(EngineStrategy):
    def create(self, name_or_url, **kwargs):
        def connect(connection_record=None):
            # dbapai-connection
            return dialect.connect(*cargs, **cparams)
        creator = pop_kwarg("creator", connect)

        pool = poolclass(creator, **pool_args)
        ...
|
整个过程大概是这样的:
- ConnectionFairy.checkout调用ConnectionRecord.checkout方法
- ConnectionRecord再回调SingletonThreadPool的_do_get方法创建rec对象
- rec对象继续调用SingletonThreadPool的creator方法
- creator方法使用dialect.connect获取数据库连接dbapi_connection
- 使用rec和dbapi_connection再创建fairy对象
- 返回fairy对象
除了执行过程在来回穿插外,还因为ConnectionFairy和ConnectionRecord是循环依赖的:
1
2
3
4
5
6
7
8
|
class _ConnectionRecord(object):
    fairy_ref = None

...

class _ConnectionFairy(object):
    def __init__(self, dbapi_connection, connection_record, echo):
        self._connection_record = connection_record
|
循环依赖的安全建立主要使用weakref,想学习的可以翻看之前的博文
execute-SQL语句
知道connection如何创建后,继续看connection使用execute方法执行sql语句:
 1
 2
 3
 4
 5
 6
 7
 8
 9
10
11
12
13
14
15
16
17
18
19
20
21
22
23
24
25
26
27
28
29
30
31
32
33
34
35
36
37
38
39
|
def execute(self, object_, *multiparams, **params):
    if isinstance(object_, util.string_types[0]):
        return self._execute_text(object_, multiparams, params)
    ...

def _execute_text(self, statement, multiparams, params):
        """Execute a string SQL statement."""

        dialect = self.dialect
        parameters = _distill_params(multiparams, params)
        ret = self._execute_context(
            dialect,
            dialect.execution_ctx_cls._init_statement,
            statement,
            parameters,
            statement,
            parameters,
        )
        return ret

def _execute_context(
        self, dialect, constructor, statement, parameters, *args
    ):
    conn = self.__connection
    ...
    context = constructor(dialect, self, conn, *args)
    ...
    cursor, statement, parameters = (
            context.cursor,
            context.statement,
            context.parameters,
        )
    ...
    self.dialect.do_execute(
                        cursor, statement, parameters, context
                    )
    ...
    result = context._setup_crud_result_proxy()
    return result
|
execute还有一些其它分支,可以适用ORM等场景,本篇只介绍纯文本的sql
函数层层穿透后,主要包括下面三段代码:
- 利用dialect创建context上下文
- 使用dialect执行sql语句(文本)
- 使用context获取执行的结果并返回
dialect涉及的上下文context创建和sql执行:
1
2
3
4
5
6
|
class DefaultDialect(interfaces.Dialect):

    def do_execute(self, cursor, statement, parameters, context=None):
        cursor.execute(statement, parameters)

DefaultDialect.execution_ctx_cls = DefaultExecutionContext
|
可以看到执行语句就是使用cursor对象,和前面直接操作sqlite一致。每条sql执行的上下文context是下面方式构建的:
 1
 2
 3
 4
 5
 6
 7
 8
 9
10
11
12
13
14
15
16
17
18
19
|
class DefaultExecutionContext(interfaces.ExecutionContext):
    @classmethod
    def _init_statement(
        cls, dialect, connection, dbapi_connection, statement, parameters
    ):
        self = cls.__new__(cls)
        self.root_connection = connection
        self._dbapi_connection = dbapi_connection
        self.dialect = connection.dialect
        ...
        self.parameters = [{}]
        ...
        self.statement = self.unicode_statement = statement

        self.cursor = self.create_cursor()
        return self

    def create_cursor(self):
        return self._dbapi_connection.cursor()
|
Result分析
sql执行的结果,在context._setup_crud_result_proxy中返回ResultProxy对象。 ResultProxy是一个可以迭代的对象,可以使用fetchone获取单条记录:
 1
 2
 3
 4
 5
 6
 7
 8
 9
10
11
12
13
14
15
16
17
18
19
20
21
22
23
24
25
26
27
28
|
class ResultProxy(object):

    def __iter__(self):
        while True:
            row = self.fetchone()
            if row is None:
                return
            else:
                yield row

    def __next__(self):
        row = self.fetchone()
        if row is None:
            raise StopIteration()
        else:
            return row

    def fetchone(self):
        try:
            row = self._fetchone_impl()
            if row is not None:
                return self.process_rows([row])[0]

    def _fetchone_impl(self):
        try:
            return self.cursor.fetchone()
        except AttributeError:
            return self._non_result(None)
|
对获取的记录还可以使用process_rows进行数据封装,这个以后再介绍。
小结
我们完整的追逐了使用sqlalchemy执行sql语句的过程,可以简单小结如下:
- 使用url语法查找并动态加载数据库方言
- 创建引擎对象,管理方言,方言的连接池,提供SQL的API
- 使用引擎对象获取到数据库链接connect,获取后的链接使用pool管理
- 执行SQL语句并获取执行结果
下面的类图介绍的更详细, 完整展示了engine/pool/connection/dialect的关系:

小技巧
deprecated是一个废弃API装饰器, 主要给一些不再支持/推荐的API加上使用警告和更替的方法:
 1
 2
 3
 4
 5
 6
 7
 8
 9
10
11
12
13
14
15
16
17
18
19
|
def deprecated(version, message=None, add_deprecation_to_docstring=True):

    if add_deprecation_to_docstring:
        header = ".. deprecated:: %s %s" % (version, (message or ""))
    else:
        header = None

    if message is None:
        message = "Call to deprecated function %(func)s"

    def decorate(fn):
        return _decorate_with_warning(
            fn,
            exc.SADeprecationWarning,
            message % dict(func=fn.__name__),
            header,
        )

    return decorate
|
比如Connectable.contextual_connect的API这样使用:
 1
 2
 3
 4
 5
 6
 7
 8
 9
10
11
12
|
class Connectable(object):

    @util.deprecated(
        "1.3",
        "The :meth:`.Engine.contextual_connect` and "
        ":meth:`.Connection.contextual_connect` methods are deprecated.  This "
        "method is an artifact of the threadlocal engine strategy which is "
        "also to be deprecated.   For explicit connections from an "
        ":class:`.Engine`, use the :meth:`.Engine.connect` method.",
    )
    def contextual_connect(self, *arg, **kw):
        ...
|
这对库/框架的开发者非常有用,API的变动可以这种方式通知使用者,进行平滑的升级替换。
最后,欢迎加下面的微信和我互动交流,一起进阶:

参考链接