这是python虚拟环境指南的第二篇,第一篇请见 Python虚拟环境指南2019版
。
合理的python虚拟环境让让开发更有序和高效。关于虚拟环境的意义,pip的使用方法可以参考第一篇。本文主要结合python3介绍如何配置虚拟环境,满足项目管理需求,包括下面四个部分:
- 使用
venv管理虚拟环境
- 使用
pipenv管理虚拟环境
- 使用
poetry管理虚拟环境
- 三种虚拟环境工具使用及建议
使用venv管理虚拟环境
python3 默认包含了 venv 模块,可以认为venv目前是python3推荐的虚拟环境管理工具。其使用命令大概如下:
 1
 2
 3
 4
 5
 6
 7
 8
 9
10
11
12
13
14
15
16
17
18
19
20
21
22
23
24
25
26
27
28
29
30
|
➜  todolist-web-py python3 -m venv --help
usage: venv [-h] [--system-site-packages] [--symlinks | --copies] [--clear]
            [--upgrade] [--without-pip] [--prompt PROMPT]
            ENV_DIR [ENV_DIR ...]

Creates virtual Python environments in one or more target directories.

positional arguments:
  ENV_DIR               A directory to create the environment in.

optional arguments:
  -h, --help            show this help message and exit
  --system-site-packages
                        Give the virtual environment access to the system
                        site-packages dir.
  --symlinks            Try to use symlinks rather than copies, when symlinks
                        are not the default for the platform.
  --copies              Try to use copies rather than symlinks, even when
                        symlinks are the default for the platform.
  --clear               Delete the contents of the environment directory if it
                        already exists, before environment creation.
  --upgrade             Upgrade the environment directory to use this version
                        of Python, assuming Python has been upgraded in-place.
  --without-pip         Skips installing or upgrading pip in the virtual
                        environment (pip is bootstrapped by default)
  --prompt PROMPT       Provides an alternative prompt prefix for this
                        environment.

Once an environment has been created, you may wish to activate it, e.g. by
sourcing an activate script in its bin directory.
|
首先创建一个虚拟环境,.venv 是我推荐的虚拟环境路径,虚拟环境创建在工作区也方便pycharm等工具配合使用。当然可以使用第一篇文章中的wrapper方案,将虚拟环境集中管理。不过这种方案有个弊端,时间久了难以记住当前虚拟环境的命名, 从而导致虚拟环境丢失,所以我不再推荐使用。
1
|
➜ todolist-web-py python3 -m venv .venv
|
然后进入和退出虚拟环境
1
2
3
4
|
➜  todolist-web-py source .venv/bin/activate
(.venv) ➜  todolist-web-py deactivated
(.venv) ➜  todolist-web-py deactivate
➜  todolist-web-py
|
windows略有不同,请参见第一篇。
我们要创建一个基于django的todo-list项目,进入环境后,可以安装django包和requests包。
1
2
|
(.venv) ➜  todolist-web-py pip install django
(.venv) ➜  todolist-web-py pip install requests
|
并生成requirements文件
1
|
(.venv) ➜ todolist-web-py pip freeze > requirements.txt
|
最后requirements显示项目安装了下面一些包:
1
2
3
4
5
6
7
8
9
|
asgiref==3.2.5
certifi==2019.11.28
chardet==3.0.4
Django==3.0.4
idna==2.9
pytz==2019.3
requests==2.23.0
sqlparse==0.3.1
urllib3==1.25.8
|
这样暴露出venv包依赖管理的弊端, todolist-web-py的requirements.txt中的包是平铺的,我们只是安装了django和requests两个包,然后各自依赖后形成9个包的列表,并且不清楚每个包是谁导入的,这样大型项目安装比较多包后就很混乱。
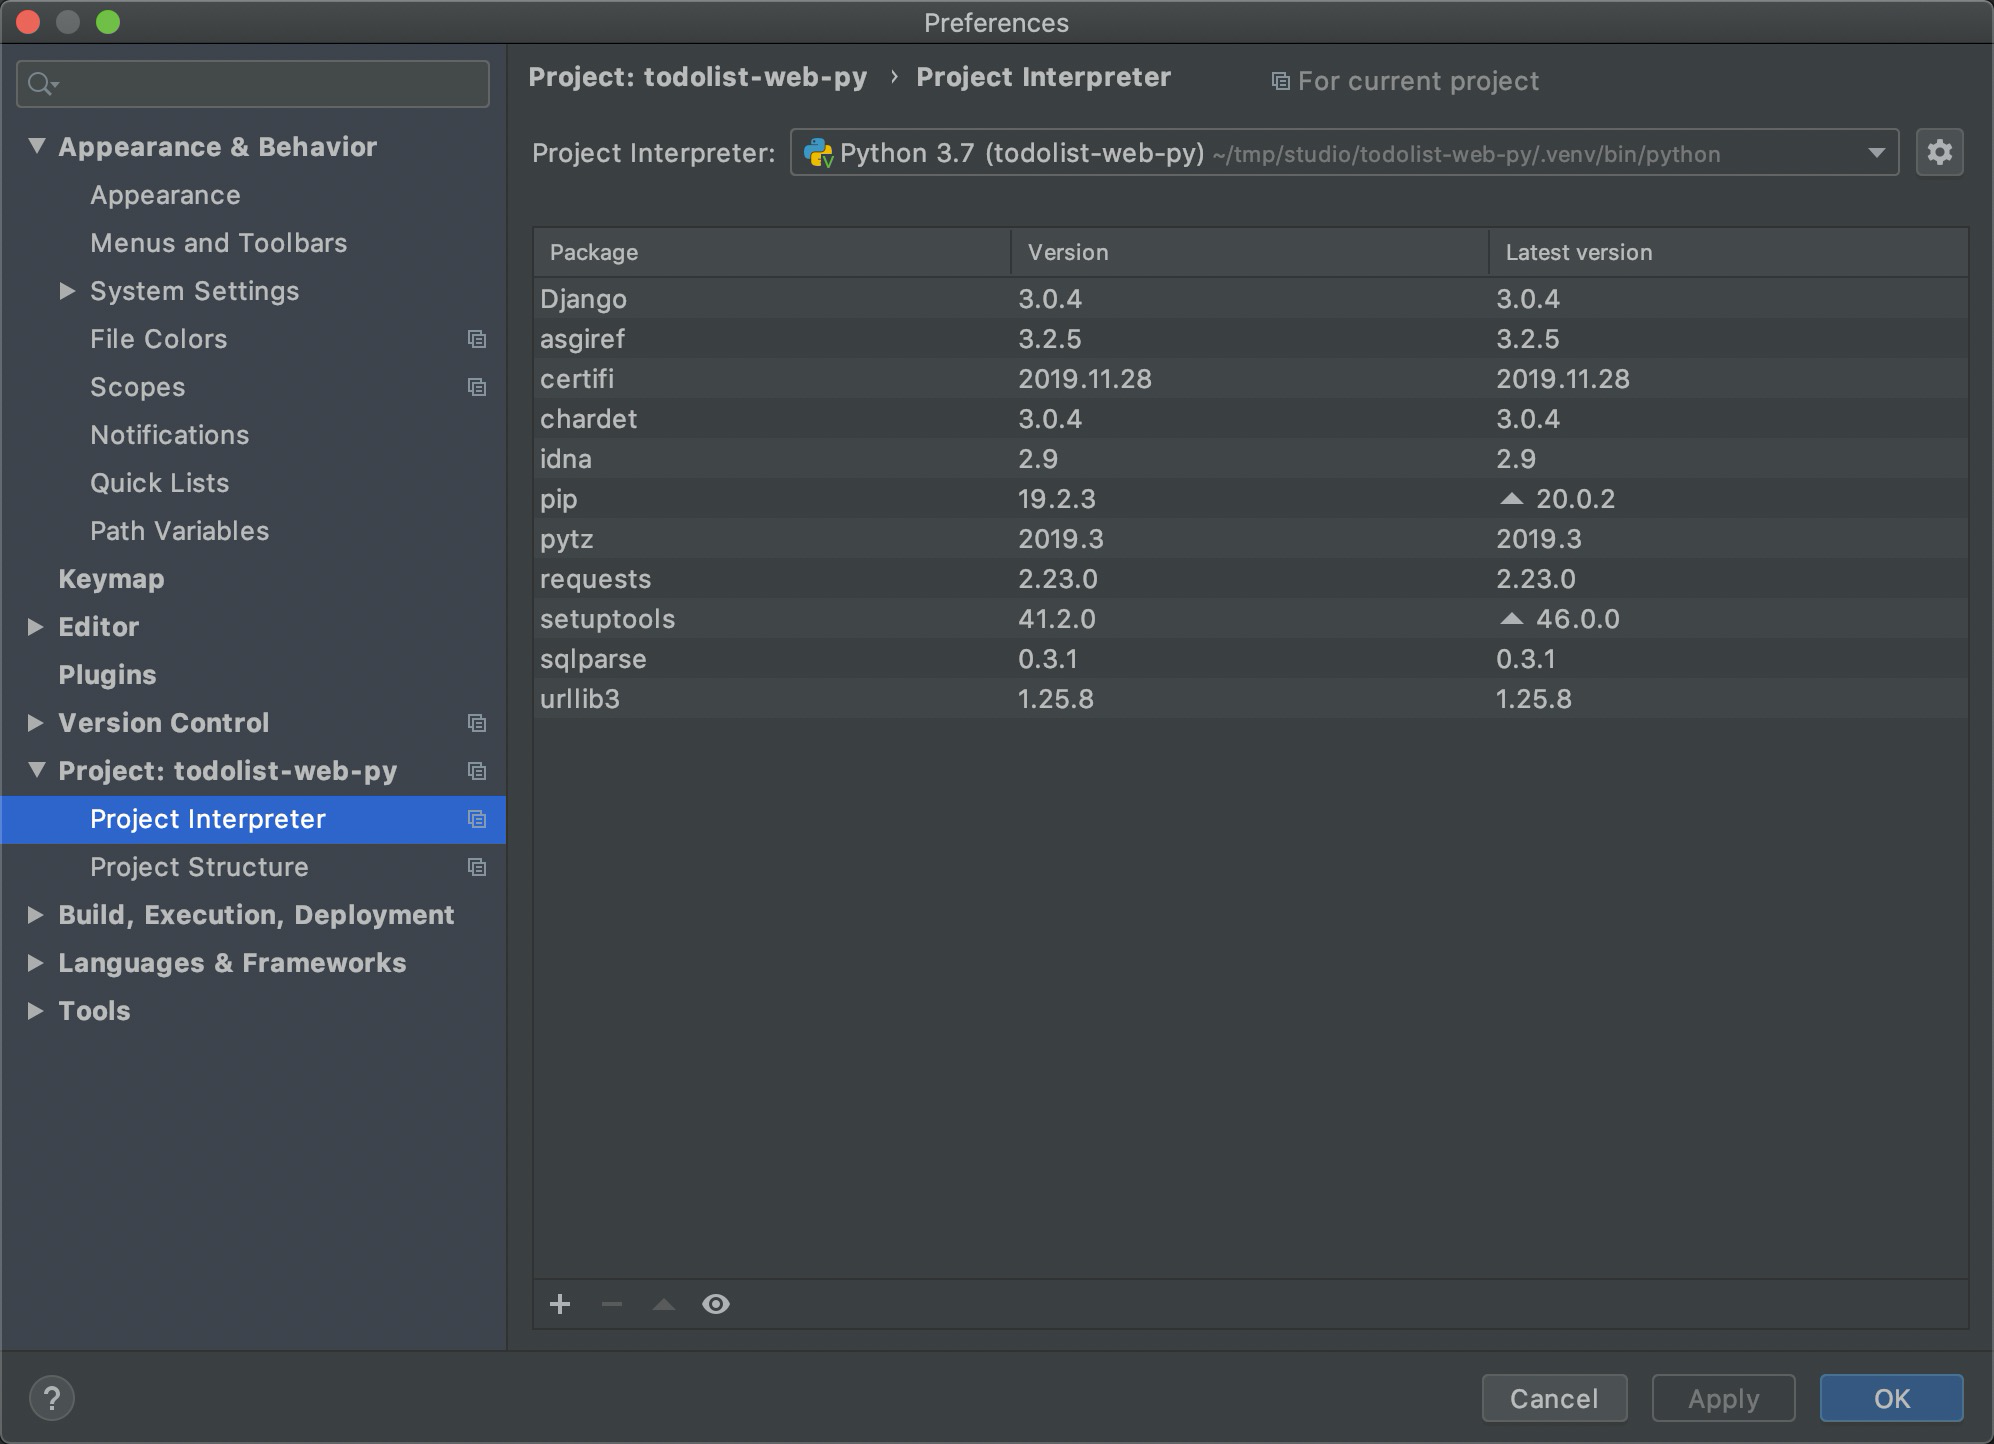
使用pycharm打开我们创建的 todolist-web-py 项目, 默认就会加载项目下的虚拟环境,cmd和ide可以很方便的共享同一个虚拟环境,如下图:
继续初始化django项目并使用git管理项目
1
2
3
4
5
6
|
(.venv) ➜  todolist-web-py django-admin startproject todo
(.venv) ➜  todo django-admin startapp app

(.venv) ➜  todolist-web-py git init
Initialized empty Git repository in /Users/xxx/tmp/studio/todolist-web-py/.git/
(.venv) ➜  todolist-web-py git:(master) ✗ touch .gitignore
|
虚拟环境和pycharm的配置均不推荐使用版本管理, 所以gitignore文件中忽略venv和idea的配置文件
最后git管理的项目文件如下:
1
2
3
4
5
6
7
8
9
10
11
12
13
|
(.venv) ➜ todolist-web-py git:(master) ✗ git status
On branch master
No commits yet
Untracked files:
(use "git add <file>..." to include in what will be committed)
.gitignore
requirements.txt
todo/
nothing added to commit but untracked files present (use "git add" to track)
|
单一的项目使用venv管理虚拟环境是非常便捷的,不过事情往往没有这么简单。我们的todo-list项目有新的需求要使用celery进行任务调度,一个任务处理excel文件,一个任务进行网页爬虫处理。这2个任务以微服务的方式独立于todo-list的web服务。不同的任务使用不同的包,最终会docker方式运行,所以每个任务项目使用独立的虚拟环境,同时整个项目公用一个git仓库。最后形成的项目结构大概如下:
 1
 2
 3
 4
 5
 6
 7
 8
 9
10
11
12
13
14
15
16
|
.
├── .git
├── .gitignore
├── jobs
│ ├── excel_dispose
│ │ └── .venv
│ │ └── requirements.txt
│ └── spider
│ └── .venv
│ │ └── requirements.txt
└── todolist-web-py
├── .venv
├── app
├── manage.py
├── requirements.txt
└── todo
|
这时候就会发现venv的弊端之一,如果将虚拟环境创建到代码文件下和git使用有些不方便。
使用pipenv管理虚拟环境
pipenv可以比较好的解决venv的两个问题,其具体安装和使用过程同样请参考第一篇,这里只是贴出其命令帮助中的示例:
 1
 2
 3
 4
 5
 6
 7
 8
 9
10
11
12
13
14
15
16
17
18
19
20
21
22
23
24
25
26
27
28
29
30
|
➜ spider pipenv --help
...
Usage Examples:
Create a new project using Python 3.7, specifically:
$ pipenv --python 3.7
Remove project virtualenv (inferred from current directory):
$ pipenv --rm
Install all dependencies for a project (including dev):
$ pipenv install --dev
Create a lockfile containing pre-releases:
$ pipenv lock --pre
Show a graph of your installed dependencies:
$ pipenv graph
Check your installed dependencies for security vulnerabilities:
$ pipenv check
Install a local setup.py into your virtual environment/Pipfile:
$ pipenv install -e .
Use a lower-level pip command:
$ pipenv run pip freeze
...
|
同样查看web服务的依赖情况,可以清晰的看到Django依赖导入了那些包,requests依赖导入了那些包,还是很清晰的。
1
2
3
4
5
6
7
8
9
10
|
➜ spider pipenv graph
Django==3.0.4
- asgiref [required: ~=3.2, installed: 3.2.5]
- pytz [required: Any, installed: 2019.3]
- sqlparse [required: >=0.2.2, installed: 0.3.1]
requests==2.23.0
- certifi [required: >=2017.4.17, installed: 2019.11.28]
- chardet [required: >=3.0.2,<4, installed: 3.0.4]
- idna [required: >=2.5,<3, installed: 2.9]
- urllib3 [required: >=1.21.1,<1.26,!=1.25.1,!=1.25.0, installed: 1.25.8]
|
相对venv的虚拟环境,项目目录下只存在Pipfile和Pipfile.lock两个文本文件,完全可以用git管理,如下:
1
2
3
4
5
6
7
8
9
10
11
12
13
14
15
16
17
18
19
20
|
➜ studio2 tree -L 3
.
├── jobs
│ ├── excel_dispose
│ │ └── Pipfile
│ └── spider
│ ├── Pipfile
│ ├── Pipfile.lock
│ └── requirements.txt
└── todolist-web-py
├── Pipfile
├── Pipfile.lock
├── app
├── manage.py
└── todo
├── __init__.py
├── asgi.py
├── settings.py
├── urls.py
└── wsgi.py
|
比较悲剧的是,如果旧的项目导入requirements.txt中的依赖包就非常慢,几分钟,十来分钟也是常有的事,如下:
1
2
3
4
5
6
|
➜ spider pipenv install -r requirements.txt
Requirements file provided! Importing into Pipfile…
Pipfile.lock not found, creating…
Locking [dev-packages] dependencies…
Locking [packages] dependencies…
⠙ Locking........
|
即使修改了Pipfile中的源到国内源也提速不了多少,据说主要是因为计算生成pipfile.loc文件, 会对每个安装包计算签名,如下:
1
2
3
4
5
6
7
|
"urllib3": {
"hashes": [
"sha256:2f3db8b19923a873b3e5256dc9c2dedfa883e33d87c690d9c7913e1f40673cdc",
"sha256:87716c2d2a7121198ebcb7ce7cccf6ce5e9ba539041cfbaeecfb641dc0bf6acc"
],
"version": "==1.25.8"
}
|
可能还有一些开源项目管理方面的问题,我们只能够期望早点改善吧。
使用poetry管理虚拟环境
在试用pipenv的过程中,又发现了一款管理工具poetry
官方推荐使用下面命令行安装:
1
|
curl -sSL https://raw.githubusercontent.com/python-poetry/poetry/master/get-poetry.py | python
|
mac安装完成还需要将默认的路径~/.poetry/bin/poetry添加到系统path
1
2
3
4
5
|
➜ poetry poetry --help
zsh: command not found: poetry
➜ poetry ~/.poetry/bin/poetry --help
Poetry version 1.0.5
|
使用 poetry init 初始化环境,可以交互式的创建过程,需要注意的是python的版本,我本机默认环境是2.7,这里需要切换成3.7版本。
1
|
Compatible Python versions [^2.7]: ^3.7
|
初始化环境后,会形成pyproject.toml内容大概如下:
1
2
3
4
5
6
7
8
9
10
11
12
13
14
|
[tool.poetry]
name = "poetry"
version = "0.1.0"
description = ""
authors = ["None"]
[tool.poetry.dependencies]
python = ^"3.7"
[tool.poetry.dev-dependencies]
[build-system]
requires = ["poetry>=0.12"]
build-backend = "poetry.masonry.api"
|
和pipenv的pipfile很类似了,然后安装环境:
1
2
3
4
5
6
7
|
➜ poetry poetry install
Updating dependencies
Resolving dependencies... (0.1s)
Writing lock file
No dependencies to install or update
|
进入环境:
1
2
3
4
5
|
➜ poetry poetry shell
Spawning shell within /Users/yoo/Library/Caches/pypoetry/virtualenvs/poetry-79xnRUxm-py3.7
Identity added: /Users/yoo/.ssh/id_rsa_yzx (/Users/yoo/.ssh/id_rsa_yzx)
➜ poetry . /Users/yoo/Library/Caches/pypoetry/virtualenvs/poetry-79xnRUxm-py3.7/bin/activate
(poetry-79xnRUxm-py3.7) ➜ poetry
|
可以看到poetry创建的环境也是独立与项目的。
然后安装flask包,默认情况下也是有些缓慢:
1
2
3
4
5
6
7
8
9
10
11
12
13
14
15
16
17
|
poetry poetry add flask
Using version ^1.1.1 for flask
Updating dependencies
Resolving dependencies... (13.9s)
Writing lock file
Package operations: 6 installs, 0 updates, 0 removals
- Installing markupsafe (1.1.1)
- Installing click (7.1.1)
- Installing itsdangerous (1.1.0)
- Installing jinja2 (2.11.1)
- Installing werkzeug (1.0.0)
- Installing flask (1.1.1)
|
查看环境里的包:
1
2
3
4
5
6
7
|
➜ poetry poetry show
click 7.1.1 Composable command line interface toolkit
flask 1.1.1 A simple framework for building complex web applications.
itsdangerous 1.1.0 Various helpers to pass data to untrusted environments and back.
jinja2 2.11.1 A very fast and expressive template engine.
markupsafe 1.1.1 Safely add untrusted strings to HTML/XML markup.
werkzeug 1.0.0 The comprehensive WSGI web application library.
|
和pipenv一样可以树状查看依赖:
1
2
3
4
5
6
7
|
➜ poetry poetry show --tree
flask 1.1.1 A simple framework for building complex web applications.
├── click >=5.1
├── itsdangerous >=0.24
├── jinja2 >=2.10.1
│ └── markupsafe >=0.23
└── werkzeug >=0.15
|
但是发现一个关于使用习惯的小问题,虚拟环境中直接使用pip命令的包,使用poetry show命令无法查看:
 1
 2
 3
 4
 5
 6
 7
 8
 9
10
11
12
13
14
15
16
17
18
19
20
21
22
23
24
25
26
27
28
29
30
|
# 虚拟环境中查看安装包
(poetry-79xnRUxm-py3.7) ➜ poetry pip list
Package Version
------------ ----------
asgiref 3.2.5
certifi 2019.11.28
chardet 3.0.4
click 7.1.1
Django 3.0.4
Flask 1.1.1
idna 2.9
itsdangerous 1.1.0
Jinja2 2.11.1
MarkupSafe 1.1.1
pip 20.0.2
pytz 2019.3
requests 2.23.0
setuptools 41.2.0
sqlparse 0.3.1
urllib3 1.25.8
Werkzeug 1.0.0
(poetry-79xnRUxm-py3.7) ➜ poetry exit
# 推出虚拟环境后查看安装包
➜ poetry poetry show
click 7.1.1 Composable command line interface toolkit
flask 1.1.1 A simple framework for building complex web applications.
itsdangerous 1.1.0 Various helpers to pass data to untrusted environments and back.
jinja2 2.11.1 A very fast and expressive template engine.
markupsafe 1.1.1 Safely add untrusted strings to HTML/XML markup.
werkzeug 1.0.0 The comprehensive WSGI web application library.
|
这样就需要注意使用习惯,避免pip直接安装包。pipenv则没有这个问题,相对来说个人更习惯pipenv一些。
poetry 同时是一个打包工具,创建默认的foo项目后,可以很方便的使用build指令打包:
 1
 2
 3
 4
 5
 6
 7
 8
 9
10
|
➜ foo poetry build
The currently activated Python version 2.7.16 is not supported by the project (^3.7).
Trying to find and use a compatible version.
Using python3 (3.7.5)
Building foo (0.1.0)
- Building sdist
- Built foo-0.1.0.tar.gz
- Building wheel
- Built foo-0.1.0-py3-none-any.whl
|
打包后项目目录如下:
1
2
3
4
5
6
7
8
9
10
11
12
13
14
15
16
17
18
19
|
.
├── README.rst
├── dist
│   ├── foo-0.1.0-py3-none-any.whl
│   └── foo-0.1.0.tar.gz
├── foo
│   └── __init__.py
├── foo.egg-info
│   ├── PKG-INFO
│   ├── SOURCES.txt
│   ├── dependency_links.txt
│   └── top_level.txt
├── poetry.lock
├── pyproject.toml
└── tests
    ├── __init__.py
    └── test_foo.py

4 directories, 12 files
|
可以很方便的应用于不需要独立部署的代码库项目。
三种虚拟环境工具使用及建议
简单总结如下:
| 工具名称 |
路径 |
依赖管理 |
使用习惯 |
推荐场景 |
| venv |
项目路径 |
平铺 |
习惯 |
小型项目和服务器上部署 |
| pipenv |
外部路径 |
树状 |
习惯 |
中大型项目开发环境 |
| poetry |
外部路径 |
树状 |
适应 |
中大型项目开发环境,有发包需求 |
总体来说,三个工具都功能类似,操作习惯也比较相识,又有各自的应用场景,可以都使用起来,等待最强大的那个一统江湖。
最后,欢迎加下面的微信和我互动交流,一起进阶: